Monday, September 7, 2015

Introducing......The Slimming Pan!!!

Have you missed the news???

TheSizzlingPan has a new venture!!! It's called TheSlimmingPan!!!
It is where I will be sharing nutritious and healthy recipes and new ideas that I will be trying in order to stay 'fit'!

I hope you like the new TheSlimmingPan!!

Please visit : https://www.facebook.com/Theslimmingpan
Thank you!
Deepti

Sunday, July 12, 2015

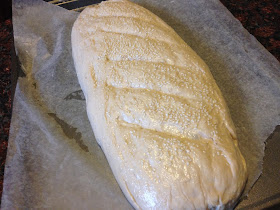
My very first...Homemade Italian Bread !!


Baking this bread... was like a dream come true!! I was intimidated by the thought of baking my own bread. I worried about the time it will consume, the hard kneading it might take, especially since I don't have a bread machine. Was worried that the texture might not come out as 'fluffy' as the chemical laden store bought breads have manipulated our tastes and perception of texture.


But finally....I made up my mind one fine day and gave it a try!!! And let me tell you...it wasn't a daunting task...nor did it need lots of kneading..and the texture was 'fluffy' but not artificial sponge like! I would say..it did take up some time...but it was mostly for the yeast to rise and the baking time.
All in all..everyone loved the Home baked... tasty... no artificial anything bread!!!


Ingredients:

2 cups warm water
1.5 cups Whole wheat flour
1.5 cups (plus some extra) All purpose flour
1 pkg or 2.5 tsp active dry yeast
1 tbsp olive oil
1 tbsp Sesame seeds
2 tsp sugar
1 tsp salt

Method:

1) To 1 cup warm water, add sugar and yeast. Keep aside for 10 mins
2) Sieve together both flours and salt. Add to the yeast and knead gently. Add warm water as needed to form a moist and soft dough.


3) Cover with a cloth and keep in a warm place for 30 mins to rise


4) After 30 mins, with oiled hands, pat down the dough.Knead into a ball.Cover again and let it rise again for 30 mins.
Again after 30 mins pat down, knead, cover and let it rise. (So total rising time will be around 1 hour and 30 mins)

5) Pre heat oven to 375 F

6) Place wax paper on a large cookie sheet. Knead the dough gently and form into a log. Pat with sesame seeds and make diagonal marks with a knife.Brush with olive oil.


7) Place the bread in the pre heated oven and bake at 375 F for 35-40 mins. If you knock on the bread, you should hear a 'hollow' sound and the bread should have a golden brown color.


8) Let it cool  for 15-20 mins before slicing with a bread knife.

9) Enjoy the bread with your favorite soup or as toasted or as Bruschetta with your favorite topping!


Bruschetta:
Brush the sliced bread with olive oil and crushed garlic. Toast in the oven for few minutes (optional) Top with sliced cherry tomatoes, chopped onions, basil, salt and pepper and grated cheese. You can drizzle the toast with balsamic vinegar if you like! Munch crunnnch...yummm!


Sunday, June 21, 2015

Dorayaki (Weekend 10: Japan)

Around the World in 30 Weekends!! The segment I wish to complete by cooking a dish from 30 different countries on 30 weekends.

Weekend 10: Japan
Dish : Dorayaki (Japanese Pancakes)

Today is Father's Day and for a special breakfast...We tried Japanese pancakes called 'Dorayaki' (shown in the Doraemon cartoon).


 These have a uniform brown appearance, characteristic texture and are eaten as a sandwich of 2 pancakes with a 'Anko :red bean paste' sweet filling. 

I obtained the Recipe from:
http://cafegarima.com/2015/06/12/dora-cake-or-dorayaki-or-fulffy-golden-pancake-sandwich-from-japan/

These were one of the best pancakes I ever had!!


We just sandwiched them with good old Nutella and Strawberry jam


Watermelon Dessert Pizza


It's summer and is sizzling hot in here! This kind of weather calls for cool and light desserts which won't leave you feeling heavy after eating them! Fruits, especially watery fruits like watermelon and berries are perfect for these kind of desserts. And best of all.....NO COOKING!!
Just cut and assemble and chill...fabulous looking dessert is done!


Here is how to make this Watermelon Dessert pizza:

Cut out a circular slice from central portion of a watermelon. 


Top with cut up berries/ fruits, chocolate chips and drizzle some frosting/ melted chocolate.

 Chill in refrigerator for 15 mins.Cut up like pizza wedge and enjoy!!

Sunday, June 14, 2015

"Princess Cake"


It was 'A's 5th birthday and she is in LOVE with princesses.I love princess this... I love princess that... is in daily conversation at least 10 times a day!

I had decided I wanted to make her a 'princess cake', but just wasn't sure how that is going to work on a week day evening of her birthday. All the previous versions I had seen of the cake called for special molds to make the evening gown like shape, or then bake 3 different cakes and carve them into evening gown like shape.All those seem too labor intensive.

As I was driving back from work...(it is 'me' time and my thinking time for me :)) I had an idea of this 'semi homemade' version of the cake:

I picked up a small chocolate 'bundt' cake from the grocery store, some strawberry icing and some sugar pearls and made this fabulous looking 'Princess Cake"


You need:
1) A small chocolate bundt cake (dome shaped cake with a hole in the center)
2) A princess doll (Check for the height of the doll or use only the upper body)
3) Some strawberry icing
4) Sugar pearls

Method: 

1) Place the doll in the center of the baked bundt cake in the hollow portion.Secure with tooth picks and icing if needed. I did not have too.


2) Decorate the Bundt like a princess gown as desired with icing and sugar pearls. 

3) You can decorate the upper princess portion with some icing to match up the gown

Done!!

Monday, June 8, 2015

Vegetable Empanadas (Weekend 9: Portugal)


Around the World in 30 Weekends!! The segment I wished to complete by cooking a dish from 30 different countries on 30 weekends.It is going slow for sure...but I am sure I will get there someday:))

Weekend 9:: Portugal 
Dish: Vegetable Empanadas

Empanadas , believed to have originated in Portugal and are a derivative of/ influenced by Indian Samosas.

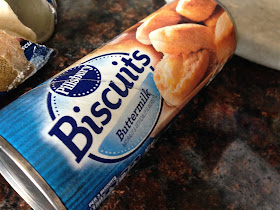
I made a semi homemade version with store bought biscuit dough and then stuffed the empanadas with two different vegetable fillings

Red pepper and Broccoli filling:

 Spinach-Corn Filling:

Recipe:
Red pepper and broccoli filling-
Saute chopped up red pepper and broccoli with olive oil, cumin seeds, chopped garlic and salt.Add red chili flakes,black ground pepper and oregano-thyme herb mixture.
After it cools completely add shredded monterey jack cheese.

Spinach-Corn filling-
I used frozen spinach.Squeeze out all the water. Saute the spinach with olive oil, chopped garlic,red pepper flakes,black ground pepper and  salt.
After it cools completely add parmesan cheese and shredded monterey jack cheese.

Method:

Preheat the oven to 400F
1) Roll out the biscuit dough into a circle with a rolling pin.
2) Place spoonful of the veggie filling in the center. Fold into a semicircle shape.
Seal the sides by pressing with a fork or folding them.


3) Place them on oiled cookie sheet and spray with a cooking spray on the top of the empanadas.
4) Bake at 400 F for 8-10 mins. Broil from top for 1-2 mins. Bake till golden brown.


Serve hot from the oven with Salsa/ Sauce of your choice and enjoy your 'culinary' vacation in Portugal!


Thursday, April 23, 2015

"Firecracker Shrimp" Indian style!!


Is it grilling season yet??

I doubled up my Panini grill to make a indoor grill and made these amazingly spicy and delicious 


'Firecracker shrimp' with an Indian touch.

Recipe:

Marinate 25 cleaned shrimp with a marinade of:

2 tsp tandoor masala powder
1 tsp red chili powder
1tsp ginger garlic paste
1/2 tsp coriander powder
1/2 tsp lemon juice
1/2 tsp oil
Salt


Thread onto skewers and Grill for 4-5 mins till done. Enjoy the lipsmackingly hot firecracker shrimp!!


Note: use paneer for the vegetarian version.

Vegeterian version:


Mini Frittatas in Appe pan


For munching or brunching.... A healthy snack!!


Mini "frittatas" a.k.a mini omlettes with vegetables and cheese, made in our very own 'Appe pan' !! 


Recipe: cracks eggs, whisk along with salt, red chili powder, chopped onion, broccoli, cilantro and

some shredded cheese. Pour into hot Appe pan greased with few drops of oil. Cover with lid to cook.

 Cook on both sides. Serve hot along with toast, butter and Maggie hot and sweet sauce!!


Sunday, March 22, 2015

Layered Chicken Biryani: Remade with new pictures!!


Chicken cooked in a spicy coconut-onion gravy, layered alternately with saffron flavored rice, garnished with fried onions, potatoes and nuts...a combination sure to fall in love with!!

Not a new recipe....but an old favorite which I remake and remake and keeping making again and again!

'M' was going be be back from a 2 week long business trip....and wanted to make something special for him. This 'Layered Chicken Biryani' is his favorite and so is my moms (who is visiting). So it was going to be a treat for them both:))


I have the recipe written down long time ago:

http://www.my-kitchens-aroma.blogspot.com/2009/09/everyday-cooking-layered-chicken.html

I still make it the same way....but now I think I have gotten a bit better at taking pictures:)) Do you agree?