Popular Recipes

Thursday, December 6, 2012

Baklava

Which 'Sweet' is Sweet,Crunchy,Buttery,Gooeey,Nutty...all at the same time?? And the answer is.............BAKLAVA is a 'sweet lovers' winner for sure! The variety of textures and depth of flavors it offers is just phenomenal and promises to satisfy the 'sweetest of the sweet tooth' :))

I made these for a friend, for her to take to her "International Business class about Turkey" as a treat after the presentation. It was a great 'project" for me..to estimate the cost, estimate how much each ingredient I will need to make the 50 pieces that she needed, how many pans and what size pieces to cut! All in all...It was a good brain workout:)
Ingredients:
1 lb Athens Fillo Pastry Sheets (I used 30 sheets)
1 stick unsalted butter
Butter flavored Cooking spray

Filling:

10 oz Almonds
10 oz Walnuts
2/3rd cup Sugar
1tsp Cinnamon powder
Zest of 2 lemons/ zest of 1 orange
1/2tsp salt
Few pieces of Pistachios for decoration

Syrup:
1.5 cups  Sugar
1.5 cups water
3/4 cup Honey
2 slices of lemon
few drops Rose essence


1) Thaw the Fillo sheets as per packet directions
2) Toast the Almonds and Walnuts separately in the oven/ microwave till slightly toasted ( 4-5 min in microwave, remove every minute and turn the nuts...otherwise they burn) Let them cool
3) In a blender pulse the nuts till coarse along with sugar, cinnamon, zest salt etc.OR chop nuts with a knife.
4) Preheat the oven to 350F
5) Brush a 8in x 12in Pan with butter or coat with butter flavored cooking spray
6) I did this pattern for assembly---(15 sheets Fillo---then nuts layer---then 5 sheets fillo---then nuts layer---and finally 10 sheets fillo) 
Details-Place1 sheet of fillo on the bottom.Spray with cooking spray/ brush evenly with butter.Repeat for the 15 sheets. Then spread half of the nuts mixture. Then place 5 fillo sheets (spreading butter in between each sheet). Then spread remaining half of nuts mixture.Then the 10 fillo sheets (spreading butter in between each sheet) and on top of the last sheet.
LIFE SAVER:  I sprayed the butter flavored cooking spray on the sheets that had broken.Spreading butter on those was really hard.
7) After the assembly, cut with a sharp knife into 30 square pieces ( 6 vertical lines by 5 horizontal lines) Place a small piece of Pistachio in the center of each piece.
8) Bake uncovered for 40 mins till golden
9) Remove from oven and let it cool uncovered for 1and 1/2 hrs
10) Syrup: Mix sugar, honey, lemon slices, rose essence, water in a pot. Bring to a boil. After it comes to a boil...boil for 10 mins. Let it cool till lukewarm
11) Pour the warm syrup on the baked Baklava. Let it soak overnight or several hours. Cut again on the same lines as  before and serve at room temperature.

Store at room temperature for upto 5 days. 

Same Filling as above in the Fillo Cups, garnished with dried Cranberry and topped with 1 tsp sugar-honey syrup


Wednesday, December 5, 2012

Chicken Kheema balls in Indo-Chinese Gravy

Like always...I overestimated how much Chicken Kheema (Ground Chicken) I would need for the Kabobs that I made for a party (http://www.my-kitchens-aroma.blogspot.com/2012/12/chicken.html) and bought like 3 lbs of it!! I had to use up the leftover Kheema...and well ....make up a yummy Lunch for the weekend. I made these delicious "Indo-Chinese Style" Curry/Gravy with Chicken Meat balls.The Spicy-Tangy Curry with the Chicken balls was a tasty lunch deal!
 "E" loves the meat balls and he had them with .any .guesses...YES.. his favorite NAAN!!


Recipe:
Ingredients:
Chicken Kheema balls--
1lb minced chicken/kheema
1 medium onion chopped finely
1tsp ginger garlic paste
1tbsp chopped cilantro
2tsp Roasted sesame seeds
2tsp Kitchen King masala
1tsp Sambal Olek paste
1tsp Ketchup
2tsp chili powder
1/4tsp turmeric
1tsp cumin-coriander powder
1/4tsp black pepper
1 egg salt to taste
Oil for pan frying the Chicken balls
oil to brush hands

For gravy:
1/2 cup thinly sliced Green,Red and Yellow Peppers each
1 Cup thinly sliced onion
2 tsp finely chopped garlic
1/2tsp ginger
2tbsp Ketchup
2tbsp Hot and sweet sauce
1tbsp Soy sauce
2tsp All purpose flour/maida(I ran out of corn flour)
1/2tsp Black pepper
1/2tsp Red chili powder(add more for spicier taste)
salt (in needed,Soy sauce is  salty)
oil

Method:
1)Gently mix together all the above ingredients for Meal balls.Do not over mix....otherwise the kheema balls come out tougher and chewy.Just mix till everything is combined well.
2) Brush  hands with oil. Keep a non stick pan with little oil on medium heat.
3) Take small amount of kheema mixture and roll into balls.Place the balls on the hot pan.Once they brown from one side, turn them.Keep a lid for 2 mins for them to cook.Turn from oil sides to brown them slightly. Drain well on paper towel.

 4) Heat 2 tsp oil. Fry the veggies in the oil along with ginger-garlic. Add 1/2tsp oil to the center of the pan, add the all purpose flour.Fry the flour in oil by stirring it for few seconds. Add water to the pan and add the sauces.
5) Add the rest of the spices and cook the Garvy till slightly thickened.
6) Just before serving, place the Chicken balls in the serving bowl and pour the curry on top.
Serve Hot with Rice or Rotis/Naan if you like!!


Monday, December 3, 2012

Chicken 'Rainbow' Kabobs with Chinese Dipping Sauce

So colorful, so tasty...you won't stop dipping and popping them in your mouth!
It was 'Diwali Firecracker Party" at 'J' kaka's house and the menu decided was 'Indo-Chinese". After much thinking...I decided to make my favorite "Baked Chicken Kheema balls" with a Chinese Dipping sauce.
 When entertaining a large crowd....I think..these work perfect as appetizers.You can make Indian, Italian, Chinese versions with the same recipe and just a few modifications.You can flavor them according to the occasion/theme and they will be mouth watering every time!!
For Indian version: Use Chicken curry masala, Ginger garlic paste
For Indo-Chinese version: Sambal olek paste, Ginger garlic paste, Kitchen King masala and serve with Chinese Dipping sauce
For Italian version: Italian herbs, cheese, crushed garlic

Recipe:
Ingredients:

1lb minced chicken/kheema
1 medium onion chopped finely
1tsp ginger garlic paste
1tbsp chopped cilantro
2tsp Roasted sesame seeds
2tsp Kitchen King masala
1tsp Sambal Olek paste
1tsp Ketchup
2tsp chili powder
1/4tsp turmeric
1tsp cumin-coriander powder
1/4tsp black pepper

1 egg
salt to taste
oil to brush hands

For Kabobs:
Green.Red,Orange,Yellow Bell peppers cut into small squares
White onion cut into small squares
Toothpicks

Method:
1) Preheat oven to 350F.

2)Gently mix together all the above ingredients.Do not over mix....otherwise the kheema balls come out tougher and chewy.Just mix till everything is combined well.
3) Brush  hands with oil
3) Take small amount of kheema mixture and roll into balls. Sprinkle some sesame seeds on top.
4) Place onto baking sheet lined with aluminum foil and sprayed with cooking spray
5) Bake for 30-35 mins till cooked through
6) Broil for 2 mins to get nice golden brown color on top.


 For serving: Place a Chicken Kheema ball,bell pepper and onion on each toothpick


Chinese dipping sauce
1/4 cup Ketchup
1/4 cup Maggie hot and sweet sauce
2tbsp soy sauce
1/2 tsp Chili powder
1/2tsp sugar
Some toasted sesame seeds.Mix the sauces and chili powder together.Garnish with sesame seeds and cilantro.


Friday, November 30, 2012

"Food for Thought"-- Do know know what will be on your table in the next few years???

 Do know know what will be on your table in the next few years???

In Vitro 'Lab made' meat? The weeds in your lawn will be your salad mix?? Which ethnic cuisine will reign supreme?? Fish Farming? Will you take a 'nutrition' pill or wear a patch???

A very curious...a very interesting read for all Food lovers:

THE TASTE OF TOMORROW by Josh Schonwald
http://www.amazon.com/The-Taste-Tomorrow-Dispatches-Future/dp/0061804215
 

After Diwali....after all the 'Faral' making...and 'going crazy' about blogging my creations....I came to a much needed break! I needed the break...BUT..... I think...As much as I was tired making the recipes...people got tired of seeing the links to those on their facebook ;) Sorry people....can't help you there!!
Will cook..Will Blog..and Will Share ;)

Anyways....
Josh Schonwald's "The Taste of Tomorrow"...was very interesting... got me thinking about "Future of Food'.What would we be eating...the trends ( The best of all..I found out there is a job called " Food Trendologist or Food Futurist"!!!) Sounds super cool right...discovering the trends in food...getting the first taste of the 'new' foods...predicting which trends will last...
But as super as it sounds...I believe it must be as difficult as well!!

From this book...I am on to a new read....Pamela Ronald and Raoul Adamchak's...."Tomorrows Table"
http://pamelaronald.blogspot.com/
This one is more about....Organic Farming and Genetics...the union of both for the bright future of farming...
Still haven't completed it...will see it it turns me into an "Organic Buyer"!


I will get back to blogging in the next few days. I am glad to have friends like you who visit TheSizzlingPan  and help me keep going:))

You guys are the BEST!!!

Deepti


Wednesday, November 14, 2012

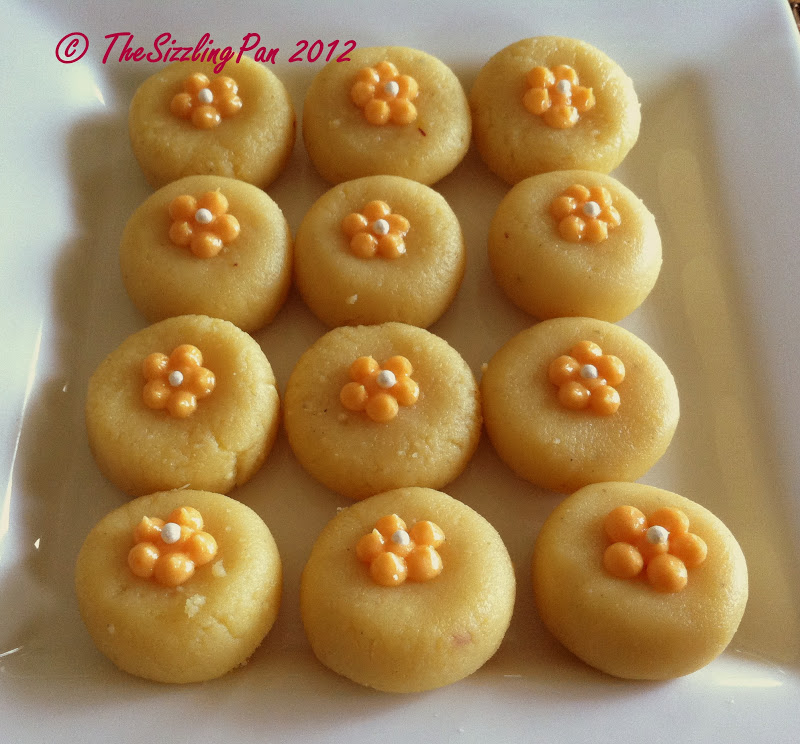
"Treats for Diwali"- Pedha with Flower icing

It's the second day of Diwali....and it is "Padwa"..the festival of "husbands and wifes"!! I couldn't resist making these "pretty" looking Pedhas to sweeten M's  mouth after the "Ovalni"(Pooja).

To make these, I used the left over "Pedha dough"(3 minute condensed milk pedhas) from the "Pedha Diyas"(http://www.my-kitchens-aroma.blogspot.com/2012/11/treats-for-diwali-pedha-diyas.html) that
 I made couple days ago and made a simple butter-sugar icing to make those pretty flowers!

Ingredients:
Pedha dough (recipe below)
Icing (recipe below)
Decorating  Edible Pearls ( Bought them from 'Cake decorating section' of a grocery store)

Here is the recipe for 3 minute Pedhas:
http://www.my-kitchens-aroma.blogspot.com/2011/03/sweet-treats-3-minute-pedhascondensed.html
( I halved the recipe for these Pedhas)

Icing:
1/4 stick butter (at room temperature)
5tbsp powdered sugar (plus little extra)
few drops of orange color/ red and yellow color(mix 4 red to 2 yellow to make orange color)
few drops vanilla essence
Zip lock bag and icing tip

1) Mix the butter and powdered sugar till smooth and without any lumps.It should make 'icing' consistency) easy enough to be squeezed from zip lock bag.Add more sugar if needed.
2) Add the orange color and vanilla essence to the icing and mix.
3) Cut the tip of zip lock bag(small enough for the icing tip to come through). Place the icing tip inside.Fill the bag with orange icing.
4) Squeeze out icing in shape of a flower. One dot in the center and 5 dots around it.

5) Place one edible pearl in the center of each flower
6) Store in airtight container in the refrigerator for up to a week.


Monday, November 12, 2012

"Treats For Diwali"- Pedha Diyas

Wish You All a Very Happy Diwali 2012!!

Festival of Lights
 

What else goes 'hand in hand' as good as "Diwali and Diyas"??? After all it is called the "The festival of Lights".And so..I thought why not make my "star attraction" this Diwali...."The Pedha Diyas"!!
I used the "3 minute microwave pedha recipe" to make the basic Pedha mixture.(I used 1/4th portion of the recipe to make the Pedha dough for the Diyas.I will make regular Pedhas with the remaining mixture)
http://www.my-kitchens-aroma.blogspot.com/2011/03/sweet-treats-3-minute-pedhascondensed.html


Ingredients:
1 stick unsalted butter+ little to butter the molds
2 cups milk powder (Use Nestle Nido if you can find)
1- 14oz can Sweetened Condensed milk
2tbsp milk with saffron

Colored Sugar( I used yellow)
Edible colors
Toothpicks

Method:
1) Bring the butter to room temperature.
2) In a microwave safe dish, mix butter, milk powder, condensed milk and flavorings of your choice.
3) Microwave for 3 mins.At each 1 min interval, mix everything together.
4) Let it cool,then form into traditional round pedhas or mold into various shapes. 
5) I molded them into "Diya" shape
6) Used a toothpick to make the 'rim' design
7) Dip the toothpick in edible color of your choice and make designs on the Diya

8) Or dip a straw in the color and make design on the Diyas
9) Pour some colored sugar in the center of the Diya


"Treats for Diwali"- Bhajani Chakali

'Diwali Faral' isn't complete without these Spiral- Spicy -Crunchy Treats.....The Chakalis!! As kids, we would be waiting for that day..when mom would prepare the chakalis!! There was a "Chakali Factory" near by our house..they made the best crispy spicy chakali ever!!! I remember..the aroma making my mouth water...as we entered the road to the factory...
In Maharashtra, Chakali is made from a special 'Flour Mix' of various grains. It is called "Bhajani".It gives the Chakali that 'crispy-crunchy' texture and the authentic taste. People either have their own "family' Bhajani recipe or now a days you can buy them in any store.My mom used to make her own..fresh...for every Diwali!
After coming to USA, I am in love with the "K-Pra' brand Bhajani. It comes with it's own set of directions and makes incredible Chakalis.
I followed the steps on the Bhajani packet.No need to add even salt or chili powder.The seasoning is perfect!!
1) After I made the Bhajani dough...'M'  helped me make the Spirals with the Chakali maker.

2) Fry the Chakalis on medium flame.Too high will burn them.Too low will make the spirals open and break the chakali (I had couple batches break :(

3) Fry till they are golden and crispy.Drain on paper towel.


If you have breakage of chakalis.....the "Tukda Chakali"(as they sold back in Pune) is delicious finger food too!
I made the "tukta chakali" into a "Rose"  like presentation  :))


Sunday, November 11, 2012

"Treats for Diwali"- Baked "Bakarwadi" Karanji (Baked Karanji with 'Bakarwadi like filling)

Thanks for the 'Baked' Crust recipe Uma!!
My friend Uma Gabale, had made 'Baked Peas Karanji" for her daughters birthday. I had loved the texture of the Crust (even though baked,it was not hard or anything.It was nice and flaky/crumbly) .Since then, I wanted to try these out...with a variation.Instead of the 'Peas' filling..I stuffed it with "Bakarwadi" like Spicy -Tangy filling of Roasted Coconut, Sev, sesame seeds, tamarind and spices.!! I thought they will be a perfect Diwali or "Anytime" treat!


My Recipe for "Bakarwadi" Like Filling:
3/4 cup dry roasted grated coconut powder
1 tbsp roasted sesame seeds
1/2cup Thin sev
2tsp Goda masala (maharashtrian curry powder)
1/2tsp garam masala
1tsp tamarind concentrate(i used tamicon)
2tsp sugar (you can add more)
1tsp chili powder (depends on how spicy you want)
1/2tsp Cumin
1tsp oil
salt
1) Dry roast the coconut powder till golden.Keep aside.
 2)Heat the oil, add the cumin and sesame seeds,stir for few seconds.Add the rest  of the spices, roasted coconut,sev,tamarind,sugar etc.Mix. This is a dry filling (and so will increase the shelf life of the karanjis than any moist filling)

Here is Uma's recipe for the crust which she modified from :
http://www.aartipaarti.com/2009/11/04/aarti-paarti-ep-30-baked-samosas/

Ingredients:
for the crust: (Makes about 30 small karanjis)
1 cup all purpose flour
1 cup whole wheat flour
1/2 cup oil
1/2 cup buttermilk (the one you find in grocery stores)
salt to taste
1/2 tsp ajwain seeds
 
Method:
1. In a large mixing bowl/paraat, combine flours, oil, buttermilk, salt and ajwain seeds and mix them until the dough forms. Knead for at least five minutes, tightly cover and keep it sitting at room temperature for at least 15 minutes (I usually end up in keeping it for 2-4 hours before I make anything out of it).
If you don't want to buy buttermilk just for this purpose, then you can use plain yogurt ~ 2 tbsp per cup flour. To get the desired consistency of dough, use water while kneading.
The dough will be softer than that of chapati.
3. Preheat the oven to 350 deg F. Grease a baking sheet.

4. Knead the dough again (it keeps exuding oil while sitting :-) ). Make balls of the dough (as big as you would make for puris). Roll each ball into a puri (not too thin, not too thick). Put 1 tbsp filling in the middle and close the puri into the shape of a karanji(half moon shape). Cut the extra edges with pizza cutter/katane.Press the edges with a fork to get closed edges and pretty look!

5. Place each karanji into the greased baking sheet. After all karanjis are ready, place the baking sheet in the oven and bake. Check after ~8-10min and turn the karanjis once when they are baked from one side. Bake the other side too (takes less time ~ 5 min)

**(After I turned off the Oven, I put the Karanjis back in for another 5-8 mins..to crisp them up)


Spicy-Tangy "Bakarwadi" Karanjis are ready for your 'anytime snack'!!

Friday, November 9, 2012

"Treats for Diwali"- Baked Shankarpalis

Baked Sweet Shankarpali


Baked "Methi" Shankarpali and Snack flowers

Today it was "Shankarpali Mania" for me..I made 3 types..yes you read it right..3 types of Shankarpali!!! And now I am dead tired even to type:(
I made:
1) "Half Whole Wheat flour and Half Maida" Shankarpali 
(http://www.my-kitchens-aroma.blogspot.com/2012/11/treats-for-diwali-half-whole-wheat-half.html)

2) Baked Sweet Shankarpali (again half whole wheat, half maida)

3) Baked 'Methi' Shankarpalis(again half whole wheat, half maida)

I was reluctant so far about making the 'baked' ones because...first "M' loves traditional sweets done traditional way. Secondly....I hardly make them every 'now and then'...I thought it was OK to indulge once in a year...and third "baked is NOT fat free'. In many baked recipes..the amount of butter used to make the dough is quite a bit and so how much fat are you really saving baking versus frying?? More Saturated fat of butter versus less saturated fat of oil while frying??

Even with all that in my mind....I still decided to try out the baked ones for myself!And I wasn't disappointed in terms of taste and texture!!!! The secret is in keeping the dough cold!! They are still delicious and crispy (M still favors the fried ones though)

Baked Sweet Shankarpali

Ingredients:
1/2 Cup Whole Wheat flour
1/2 cup Maida (All purpose flour)
1/2 cup sugar ( use little less than 1/2 cup)
1/4 cup unsalted butter (room temperature)
1/4tsp salt
1/2tsp Baking powder
cold water

Method:
Pre heat the oven to 350F
1)  To the solid room temperature butter(NOT melted butter), add the flours, salt, baking powder.Mix and rub together to get crumbly texture.Add the sugar and mix
2) Knead into stiff dough with cold water.Wrap in plastic wrap and keep refrigerated for 2 hrs.
3) Roll out into thick Chapatis and cut into diamond shape.
4) Place the diamonds separately on a cookie sheet and bake for 7-8 mins on one side(they burn easily!!! Keep an eye on them) . Take out,flip the diamonds and bake for another 3-4 mins ..until golden brown.
Mine came out more brownish on the bottom side than the top


Baked Methi Shankarpali and flowers

 I loved their texture and how tasty they are as snacks(even for non Diwali time)!!


Ingredients:
1/2 Cup Whole Wheat flour
1/2 cup Maida (All purpose flour)
1/4 cup unsalted butter (room temperature)
2 tsp toasted sesame seeds
1tsp Ajwain/owa
3tsp Kasoori methi leaves(dried methi)
1/4tsp Black ground pepper

Salt
1/2tsp Baking powder
cold water


Method:
Pre heat the oven to 350F

1)  To the solid room temperature butter(NOT melted butter), add the flours, salt, baking powder and the spices.Mix and rub together to get crumbly texture.
2) Knead into stiff dough with cold water.Wrap in plastic wrap and keep refrigerated for 2 hrs.
3) Roll out into thick Chapatis and cut into diamond shape or use a cookie cutter to cut out flowers or other shapes
4) Place the diamonds/flowers separately on a cookie sheet and bake for 7-8 mins on one side(they burn easily!!! Keep an eye on them) . Take out,flip the diamonds and bake for another 3-4 mins ..until golden brown.
Mine came out more brownish on the bottom side than the top (actually some burnt a little at the bottom....so keep an eye on them!!!)