Popular Recipes

Tuesday, June 30, 2020

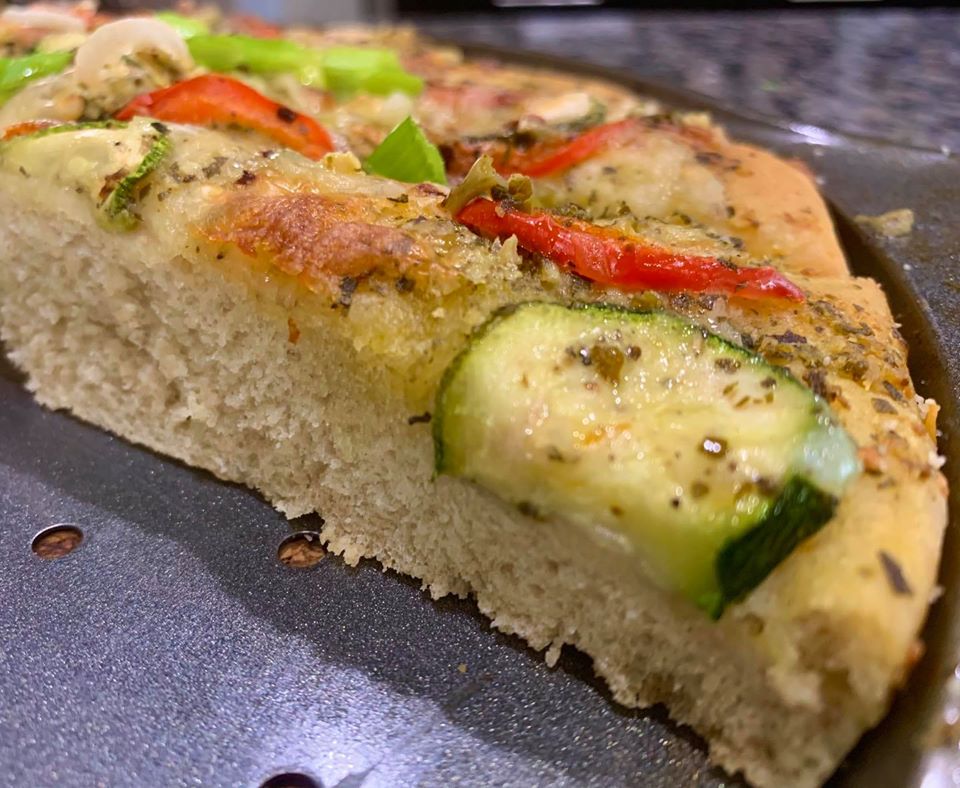
Zucchini And Red Pepper- Pesto Pizza


“Zucchini and Red Pepper Pesto Pizza”
It was Father’s Day and kids had made plans for a Homemade Pizza for Daddy☺️ ❤️
We made a half whole wheat-half bread flour crust and topped it with Basil Pesto, zucchini & red pepper slices and cheese. 

Zucchini on pizza might sound odd... but after trying Papa Murphys Thai pizza in the past that has zucchini as a topping.... It tastes great and we like it! 
The crust came out perfectly spongy on the inside and crusty on the outside.

Pizza Crust: ( I made it in bread machine)
Makes a 12 inch thick crust pizza

1 and 1/4 cup warm water
1.5 tbsp olive oil
3/4 tsp honey
1.5 tsp salt
1.5 cups Whole wheat flour
1.5 cups Bread flour
1 and 3/4 tsp yeast

1) Mix and Knead all ingredients into soft dough and keep in warm place for 1.5 to 2 hrs.
2) Pre heat oven to 415F
3) Spread and roll out the dough into oiled pizza pan.
4) Apply Basil pesto evenly.( I used store bought) 
5) Top with thin zucchini and red pepper slices. Season with Italian/ pizza herb seasoning, red chili flakes, black pepper and shredded cheese. 


6) Bake at 415F for 20-25 mins.
Enjoy hot out of the oven....Delishhhhhh!!! 
😋

Chicken Kati Rolls/ Chicken Frankies


“Chicken Frankies/ Kati Roll” 
Boneless Chicken marinated in spicy Indian masalas, pan fried till slightly brown and then wrapped up in flour tortillas/ rotis/ chapatis along with pickled red onion, Cilantro-Chili chutney. Deliciousness unbounded! 😋😋

Today, I used a shortcut marinade of thick yogurt, chicken tikka masala, red chili powder, turmeric, cumin, ginger-garlic paste, mint powder and salt for the chicken and used store bought Flour tortillas as wrap. Made dinner prep so much easier! 

*** Full authentic recipe version can be found here:
http://my-kitchens-aroma.blogspot.com/…/everyday-cooking-ch…

Tuesday, June 16, 2020

Dark Chocolate Cake with Neon-Pink Whipped Cream Frosting


Special birthdays deserve special homemade cakes!💕 We had a special milestone birthday of our little one and celebrated with this very pink-princess like cake😊

This year her demand was for a chocolate cake and hence baked a dark chocolate cake with neon pink colored whipped cream frosting. I love the stark contrast of dark chocolate with neon pink. The cake looks gorgeous in that combination!


Dark Chocolate Cake (Makes a small 6 inch cake)
1 cup All purpose flour
3/4 cup Sugar
1/3 cup Yogurt (whole milk)
1/3 cup Water
1/3 cup Unsweetened dark cocoa powder
1/4 cup Unsalted butter
1 Egg
1 tsp Bru instant coffee powder
3/4 tsp Baking powder
1/2 tsp Baking soda
1 pinch salt

1) Preheat oven to 350F. Layer 6 inch circle cake pan with parchment paper on the bottom. Coat with oil/butter on the pan sides and dust with some flour to avoid the cake sticking.
2) Beat butter, egg, salt and sugar till light and fluffy. Add yogurt, water and rest of the ingredients. Beat till well mixed. Do not over mix!
3) Pour into the loaf pan and bake for 30-40 mins. Check with toothpick. It should come out clean.
4) Let the cake cool completely.
( ** Or you can bake the cake the day before to save time)

Neon-Pink Whipped Cream Frosting
 (I add some cream cheese to stabilize the whipped cream and cut the sweet taste)
2 Cups Heavy Whipping Cream (chilled)
1/2 cup softened cream cheese
4 tbsp sugar (Add more for sweeter taste)
2-4 drops Neon Pink gel food color (Depends on desired color)
Pink and White Sugar pearls for decoration
(** This makes little extra frosting than needed. Any leftover frosting can be frozen in freezer safe containers)

1) Beat the cream cheese, sugar and heavy whipping cream in chilled bowl till stiff peaks form.
Keep aside about 1/2 of the white icing in a bowl in the refrigerator
2) Add neon pink gel color to the rest of the icing and beat for few seconds. Fill in piping bag with large rosette piping nozzle and store in refrigerator till ready to use.

Cake Assembly:
1) Place the cake on serving platter/ cake stand that can be refrigerated. Coat the completely cooled cake with thin layer of white whipped cream frosting.This is called 'crumb coating' and helps with the next layer of smooth frosting without any cake crumbs. Keep the cake in the refrigerator to set for 30 mins.
2) Layer the cake with pink frosting on bottom and white of top and side. Smoothen it out with icing knife/ spatula.
3) Pipe rosette pattern with pink frosting on the top
4) Cover the entire top surface with rosettes. Decorate with pink sugar pearls on top and white sugar pearls on the bottom/sides
5) Refrigerate the cake after frosting/ decoration is done. Whipped cream frosting starts to soften at room temperature, so the cake needs to be stored in refrigerator.

Tuesday, June 9, 2020

Raspberry-Blackberry Chip Ice cream

Summer means lots of Berries and lots of Ice cream! I love the 'Black Raspberry Chip' ice cream from Graeter's and also by the 'Homemade' brand which comes very close to Graeter's in flavor.
I didn't have any Black raspberries, so tried to make my favorite flavor of ice cream with combo of  Red Raspberries and Blackberries and Dark chocolate with almonds. The combination worked well and the ice cream turned out super awesome and Yumm!
This ice cream recipe is super easy to make and the ice cream comes out perfect textured! You can use Heavy whipping cream+ Condensed milk and add pretty much any flavor you want to make your very own delicious homemade ice cream!
Ingredients: (Makes about 2 cups or 4 small scoops)
1/2 cup (heaped) Red raspberries+ Black berries
1/2 Cup Heavy whipping cream (unsweetened), chilled
1/4 cup Sweet condensed milk
2 tbsp milk (cold)
2 tbsp chopped dark chocolate with almonds (I used Hershey's Dark Chocolate with almonds bar)
3 tsp sugar
Edible sugar pearls (optional) for decorating the glass
Method:
1) Add the berries to a pan. Add 3 tsp sugar and cook for 3-4 mins till berries start to cook. Crush the berries with spoon. ( I didn't mind the tiny berry seeds and pulp in the ice cream. You can strain the puree if you don't like pulp/seeds) The berry sauce will reduce to about 1/4 cup. Let the berry puree cool down completely and then refrigerate for 15 mins.
2) Mix the cooled berry puree, condensed milk and normal milk in a bowl.
3) Beat the chilled heavy whipping cream with electric mixer till stiff peaks form. 1/2 cup heavy whipping cream will yield 1 cup whipped cream after whipping is complete.
 Reserve 1 tsp whipped cream for decorating the glass later. Save it in the refrigerator.
4) Gently fold in the whipped cream and chopped dark chocolate into the condensed milk-berry mixture.
5) The mixture will be thicker than smoothie consistency. Pour into freezer safe container. Add extra chopped dark chocolate on top.
6) Freeze for atleast 7 hrs for perfect consistency of the ice cream
7) Serve chilled in ice cream glass with extra berries and sprinkle some chopped dark chocolate 
Optional: Apply the reserved whipped cream as a glue to the rim of the glass. Stick the edible sugar pearls to the rim with whipped cream to decorate the ice cream glass.
Enjoy the delicious treat of homemade ice cream !

Saturday, June 6, 2020

Fusion Cuisine-"Paneer Tikka Pizza"


One of our favorite versions of Pizzas is the fusion kinds- with Indianized toppings. Crusty pizzas with spicy-zesty toppings like Paneer Tikka, Chicken Tikka or even Butter Chicken ....They have the Best of Both Worlds!
I have tried several of the fusion kinds previously with either ready made crusts or with pizza crust mix:
"Spicy Chicken and Red Pepper Pizza"(https://my-kitchens-aroma.blogspot.com/2012/05/fusion-cuisine-chicken-and-red-bell.html)
"Pav Bhaji Pizza" (https://my-kitchens-aroma.blogspot.com/2011/05/fusion-cuisine-pav-bhaji-pizza.html)
"Paneer Tikka Pizza" (https://my-kitchens-aroma.blogspot.com/2011/02/fusion-cuisine-paneer-tikka-pizza.html)

But lately we have been making the crust at home. And OMG....It is so easy and comes out great! Once you get the taste of homemade Breads and Pizza crust...there is no going back!!!
I use the Bread machine to do the kneading cycle and rising for me, so it becomes as easy as 'dump the ingredients and walk away'!!!😁 If you do not have a bread machine, there are many super easy recipes to make pizza crusts at home which don't require much kneading and rising time.
Even this “20 Min One-Pot Pizza” from ‘Tasty’ is worth a try!!! (https://www.facebook.com/464363670276153/posts/1884352798277226/?d=n)


Bread machine Pizza Base: (Makes one 12 inch Pizza) You can double the recipe for 2 pizzas.
1/2 cup plus 2-3 tbsp extra water (Use Luke warm water)
2 cups Bread Flour
1 tbsp Olive oil
1 tbsp Sugar
1 tsp Yeast (Use fresh/non expired)
1 tsp salt
**2 tsp Sooji (Rava) will be needed when ready to bake the pizza crust (to spread on baking sheet to avoid sticking)

Add the ingredients to the bread machine in the order listed. Turn on 'Dough' cycle. Add the extra water if the dough is too hard. Or little extra flour if dough is sticky. Let the dough knead and rise in the bread machine (It takes 1. 5 hrs in my bread machine) Knead with oiled hands once done.


Paneer Tikka Topping:
1 cup paneer cubes
1/4 cup thick yogurt
2 tsp Tikka masala (I used Aachi Chicken Tikka masala)
1 tsp Cumin-Coriander powder
1/2 tsp Red chili powder
1/2 tsp ginger garlic paste
1/2 tsp turmeric
salt
Mix the yogurt and spices. Add paneer cubes and mix gently. Marinate all the above and keep in refrigerator for 30 mins

Other Toppings:
1/2 cup Shredded cheese (I used mozzarella)
1/4 cup Pizza Sauce (I used pasta sauce instead because that's what I had!)
Circular slices of red onions
Thinly sliced Red pepper
Broccoli florets
Cherry tomatoes
1 tsp Italian herb seasoning
Chopped cilantro
Red Chili flakes

Method:
1) Pre-heat oven to 415 F
2) Spray olive oil on the baking sheet. Sprinkle sooji/rava evenly on the baking sheet.
3) With oiled hands spread out the dough (with even thickness all over). Prick evenly with fork.
4) Top with pizza sauce, Veggies and Paneer tikka topping, Italian herb seasoning and Cheese.
(If there is any yogurt-spice marinate leftover, drizzle over the toppings)

We like to make patterned arrangements like in the picture. Kids have fun doing it!


5) Bake at 415 F for 20-25 mins. Till crust is golden brown and cheese is melted and slightly browned.


6) Remove from oven and let it cool for few mins before slicing the pizza.
Garnish with chopped cilantro, red chili flakes and Serve hot! Enjoy!!!😋😋😋


Sunday, May 31, 2020

"Mango-Saffron-Pistachio" Biscottis


Biscottis are one of my favorite baked goods! I love the crunchy texture that comes because of baking twice (Biscotti means twice baked cookies! ) with mild sweetness and the versatility to bake them with different flavors of choice. Here are a few of my favorites- (https://my-kitchens-aroma.blogspot.com/search/label/Biscotti)
Today I baked this new flavor combo which reminds me very much of the summers in India! The sweet warm fragrance of Mangoes is all over and everyone is trying out their favorite summertime mango recipes during the summer months.
The Italian biscotti got a very summery and warm makeover today with warm-aromatic flavors of Mango and Saffron and crunch from Pistachios. I love the flavor, color, aroma and everything about these biscottis😍 My new favorite!


Recipe:
2.5 cups All purpose flour (Plus little extra)
1/2 cup Mango Puree (I used Desai Bandhu Ratnagiri Alphonso canned puree)
1/2 cup granulated sugar (add extra for sweeter taste)
1/2 cup powdered sugar
5 tbsp Unsalted Butter (room temperature)
1/4 cup chopped roasted pistachios (plus some extra for top garnish)
1 Egg
2 tsp milk with 1/2 tsp saffron strands
2 tsp baking powder
1 pinch salt

** Note: Baking sheet thickness and oven temperatures vary slightly from oven to oven. So always keep an eye on the baked goods and adjust the time as needed


1) Preheat oven to 350 F. Apply butter to baking sheet.
2) Cream together butter, salt, egg, sugar. Add mango puree and saffron in milk and mix.


3) Add flour, baking powder and chopped pistachios. Mix and knead gently into soft dough. Add little extra flour if needed. The dough will be slightly sticky. With oiled hands, form into logs and flatten them on to the baking sheet. Garnish with chopped pistachios and press on the dough.


4) Bake at 350 F for 20-25 mins. Keep an eye on the biscotti logs and don't let them brown too much on the bottom.

5) Take out from the oven and let cool for 5 mins. Slice the biscottis with a sharp serrated knife.

*** Now turn oven temperature down to 300 F for the next baking step


6) Arrange the cut biscottis on buttered baking tray and put back in the oven at 300 F for 20-25 mins till crunchy. (Again don't let them brown!)


Let them cool completely. They will crisp up more as they cool.
** If you prefers crunchier Biscottis ...Keep them at 300F for 6-8 mins more. Or Leave them in the oven for few mins after you TURN OFF the oven. They will crisp up on the residual heat of the oven.

Enjoy with your tea/coffee or as dessert! 😋


Friday, April 24, 2020

Layered Chocolate cake with Whipped Strawberry cream


Family birthdays are super special and we love to celebrate the special day with homemade cakes. Homemade cakes are the most delicious of all cakes, isn't it? You can choose and control which and how much of the ingredients you want to add to make the cake your very own. I love to experiment and play around with different proportions and ratios of the ingredients and observe the effects on the resulting textures (That's the scientist in me talking😁) I also feel, baking and cooking are very therapeutic for my mind and brain that is racing at 100 miles/hour usually 😜. So here is the latest baking therapy from this week. Baked a small chocolate cake in bread load pan and then layered it with fresh strawberry whipped cream. Strawberries and chocolate go so well together and love the stark contrast in the layering pattern of dark brown and pink colors.


  • Cake:
1 cup All purpose flour
3/4 cup Sugar
1/3 cup Yogurt (whole milk)
1/3 cup Water
1/3 cup Unsweetened dark cocoa powder
1/4 cup Unsalted butter
1 Egg
1 tsp Bru instant coffee powder
3/4 tsp Baking powder
1/2 tsp Baking soda
1 pinch salt

  • Strawberry whipped cream:

1. 5 cups heavy whipping cream chilled
1/2 cup Strawberry puree ( Puree cooked with 3-4 sugar and till thick, strained and chilled)
1/3 cup powdered sugar
2-3 drops pink food color (optional)
Whip the cream till soft creams form with electric mixer. Add strawberry puree and powdered sugar and whip till firm peaks form. Keep refrigerated till ready to use.


  • Chocolate ganache drizzle: (Prepare at the time when needed)

4-5 Lindt dark chocolate squares, 2tsp heavy cream. Microwave for 20-25 sec till melted and smooth enough to drizzle.

1) Preheat oven to 350F. Layer bread loaf pan with parchment paper on the bottom.
2) Beat butter, egg, salt and sugar till light and fluffy. Add yogurt, water and rest of the ingredients. Beat till well mixed. Do not over mix!
3) Pour into the loaf pan and bake for 45-50 mins. Check with toothpick. It should come out clean.
4) Let the cake cool completely. Slice into 3 layers with large sharp knife.


5) Layer with strawberry whipped cream on the bottom layer. Place the cake layer and repeat for all layers.


6) Top the uppermost layer with whipped cream and drizzle with ganache on the sides


7) Decorate with whipped cream and fresh cut strawberries
8) Keep the cake chilled in refrigerator


9) Enjoy with your loved ones😍