Popular Recipes

Tuesday, May 17, 2011

"Everyday Cooking"- Egg Bhurji Pav/ Spicy Egg Scramble Sandwich

Amongst the 'street foods' in Pune, this one is probably not a very famous one.Mostly because it is sold on 'not so fancy' carts and also sold mostly outside ' drinking bars'.We made 'Egg Bhurji' many times back home and had it mostly with chapati.It was so quick, tasty and high protein food.
The other day, I wanted to make a 'fancy' sandwich for dinner.I thought..why not 'up-notch' Bhurji-Pav , give it a 'Make over' and make it into a 'fancy' sandwich!!!
Ingredients:
For all the vegetarians out there:  Use Paneer to make 'Paneer Bhurji' instead of eggs.
 
Eggs Bhurji/Spicy egg scramble:

4 Eggs
3/4th cup Chopped onion
1/2tsp turmeric powder
1tsp Chili powder
1/2tsp Chicken masala/ Kitchen King masala
1/4th tsp Black ground pepper
1tbsp Chopped cilantro
oil
Salt

Toppings:
1/4th cup sliced red pepper
1/4th cup sliced green pepper
1/2cup sliced onions
1/4th cup shredded cheddar cheese
1/4th cup Maggie Hot and Sweet sauce( I loveeeee this sauceeee!!!!)

4 Brat Buns

Method:
1) Stir fry the sliced red,green pepper and onions for couple mins.Season with salt and black pepper.Keep aside.
2) In 1 tbsp oil, fry the chopped onion till for 3-4 mins, add the chili powder,chicken masala, black pepper,salt and add the eggs one by one.Keeping stirring to get a good scramble.Cook till well done.Add the chopped cilantro.
3) Cut open the Brat bun, add  the green and red peppers, onions,eggs bhurji.Top with cheese and maggie hot sauce


4) Heat a grilling griddle and grill the sandwich ( on little butter if you like) till it gets the grilling marks.
5) Serve this Spicy Sandwich ....Hot hot hot!


Friday, May 13, 2011

"Pat a Cake"- Vegan Chocolate Cake (Eggless,Butterless)

Flower Shaped Cake: Happy 11th Month B'day my sweet little flower  "A "

Recipe by:Sheetal Momaya
My good friend Sheetal bakes amazing 'vegan' cakes. She is so good at baking, you cannot believe you are eating a home baked cake. I wish I could show you all the pictures of the cakes she has baked.They are truly a piece of art.Her cakes, though butterless and eggless...are still so moist, fluffy and delicious!!! You do not miss anything that is not in there!!! What you realize is that...you are in mouthful of Cake bliss!!!
Finally this week,I got to learn this cake from her.We made a 'Bundt' Cake which was totally 'vegan'.The Icing was melted 'white chocolate' (non vegan).
 But you can use 'vegetable- shortening' based icing to make it vegan.
 Ingredients:
1 and 1/2 cup all purpose flour (sifted)
3/4th cup Granulated Sugar
1/3rd Cup Canola oil
1/4 th cup Cocoa powder
1tsp Baking soda
1/2tsp salt
1 and 1/2 tsp Vanilla extract
1 tbsp Vinegar
1 cup cold water

Icing:
3/4th cup White chocolate chips
Sprinkles for decoration
Oreo cookies for flower 'center'

Method: ( Sheetal gave me her 'expert' tips to bake this cake)
1) Preheat the oven to 350F (preheating is very imp). Grease the bundt pan/ any 8 inch pan with vegetable shortening. Apply liberally in all corners.Dust with all purpose flour to coat the pan.
2)First sift flour, sugar separately.Then by a spoon add to the measuring cup to measure exact amounts.Level with a knife.DO NOT pack the flour into the cup.The ratios will change and the cake will not come out as good.
3) Mix wet and dry ingredients in separate bowls.
4) Mix them together in a single direction.Bubbles will appear as vinegar reacts with baking soda.Do not over mix.But all the lumps should be gone
5) Bake in preheated oven for 20-25 mins.Do not open the door for first 20 mins atleast.
6) Check with a tooth pick, if the cake is done.The inserted toothpick should come out clean.
7) Flip on a serving platter carefully
8) Let it cool for 1/2hr or so before icing.
9) Melt the white chocolate in low power in the microwave oven till melted. Slather onto the cake.
10) Decorate with oreo cookies (flower center) and sprinkles to give it color.

Serve the cake at room temperature.The white chocolate hardens at cold temperature and will crack when cutting.


Sunday, May 8, 2011

"Appetizers"- Vegetable Manchurian(Dry)

Indo-Chinese cooking is fun, tasty and one of my favorites. Back in Pune, there were always tons of street vendors selling this type of food.It used to be a 'to go' spot for youngsters. The food was tasty- really spicy- and probably nothing like the real 'Chinese' food!!!Actually many of the cooks at these stalls were 'Nepali' and not real 'Chinese'!! But they had successfully captured the 'Indian taste buds'!!

Ingredients:
1/2 cup finely chopped cabbage
1/2cup finely chopped carrots
1 tsp Ginger garlic paste
1tbsp chopped cilantro
2tbsp Soy Sauce
2tsp Maggie hot and sweet sauce
1/4tsp black pepper
1/4tsp red pepper flakes
1/4 cup finely sliced green peppers
1/4 cup sliced carrots
few broccoli crowns
1tsp sliced green chilies
2tbsp all purpose flour
1tbsp Corn flour
salt
oil

Method:
1) Mix together finely chopped cabbage, carrots, all purpose flour,corn flour,black pepper,1/2tsp ginger garlic paste, red pepper flakes, salt,1 tbsp soy sauce.
2) Add little water and make into thick batter( you should be able to make Manchurian  'balls' for frying)
3) Deep fry the balls till golden brown. Keep aside

4) Shallow fry sliced green peppers, carrots, broccoli, green chilies and remaining ginger garlic paste. Fry just for couple mins.The veggies should remain crisp.
5) Add the soy sauce, hot and sweet sauce, Manchurian balls and mix.
6) Garnish with Cilantro.

Friday, May 6, 2011

"Fusion Cuisine"- Pav Bhaji Pizza

Pav Bhaji (meaning a mix- vegetable -spicy mash served along with buttered bread) is one of the most famous and favorite street foods in India. They have this big flat tava (pan), on which they make the Bhaji as per demand and toast the bread on 'ample' amounts of 'Amul' butter!!!! The combination is just mouthwatering! And 'eye' watering too ..due to the spiciness!
Pav Bhaji is 'M's favorite.Even now, when we visit India, he wants to eat the red spicy buttery Pav Bhaji with an 'extra' Pav Jodi! Whenever I make it at home, he tells me to make it enough for at least 3 meals.He can eat it everyday...if I decide to make it that often, that is!
So..it means many times I have Pav bhaji left over from previous meals. I decided to revitalize the leftovers and make this 'Fusion' pizza---- Pav Bhaji Pizza. Later I got to know that my 'innovation' came a little too late...a restaurant in California already has 'Pav Bhaji Pizza' on menu and my sister tells me, it is very common in Pizza joints in Pune! Oh well....may be someday I will really make some food innovation!

Pav Bhaji:
3 boiled potatoes
1/2 cup finely chopped cauliflower
1/4 cup finely chopped cabbage
1/4cup carrots finely chopped
1 cup finely chopped green pepper
1/2 cup green peas+ 2 tbsp peas(boiled)
1 big onion chopped
3 red ripe tomatoes finely chopped/ tomato puree
1 tsp ginger garlic paste
1-2 tsp Everest Pav Bhaji masala
1/4 tsp Garam masala
1-2 tsp Red chili powder
salt
oil
Butter(Amul if possible)
Veggies: Green beans, zucchini etc can also be added to make it more nutritious.
Method:
1) Pressure cook all the veggies. Mash them well.Grate/mash the boiled potatoes.
2) In 2 tbsp oil, fry the chopped onion til tender.Fry the tomatoes till soft and tender. Add the pav bhaji masala, garam masala, chili powder,salt,veggies and fry. Add little water to get desired consistency.
3) Top with butter.Add the 2 tbsp green peas for pop of color.
4) Serve with toasted bread nicely buttered. Garnish the Pav bhaji with chopped onions ,cilantro and squeeze of lemon juice.
5) Serve Hot!

Pav Bhaji Pizza:

1) Boboli Pizza base
2) 1 cup Pav Bhaji
3 ) 1/2 cup Onions and green pepper sliced vertically
4) 1/2 cup Pizza blend shredded cheese(mozzarella,, cheddar etc)
5) 3-4 tbsp Ketchup/Pizza sauce
6) 2 pinches ajwain/Oowa
7)Chopped cilantro

Method:
1) Spread the ketchup/ pizza sauce on the pizza crust
2) Top with Pav Bhaji, onions, green peppers, cheese, ajwain, cilantro

3) Bake at 400 F( or as per directions on Pizza base/crust) for 8-10 mins
4) Bake till all the cheese is melted and bubbly...and the base is crisp.
5) Broil for 2 mins to melt the cheese and get the golden brown color
5) Serve hot!
                                        Enjoy the 'Indianized' version of pizza!

Tuesday, May 3, 2011

"Everyday Cooking"- Vegetable Lo mein

After coming to US, I became a big fan of Food Network.After coming back from work in the evening my favorite show was '30 minute meals' by Rachael Ray. She 'put together' an entire meal in 30 minutes! Now,that is what a 'tired' girl wants after a long day at work...a quick, easy, fast cooked hot meal!!
Rachael uses 'Spaghetti' as Noodles for many of Thai and Chinese dishes. I liked the idea.No need to run to 'chinese' store to hunt 'Hakka' noodles and more important ......pastas are less sticky...so the Noodles come out perfect and non sticky..everytime!

Ingredients:
4 'fistfull' of 'Thin Spaghetti' Pasta
1tsp ginger-garlic paste
1/2cup Sliced Green pepper+ Red Pepper
1/2cup sliced Carrots
1/4 cup sliced mushrooms
1/4 cup chopped Green onions
1/4cup corn kernels
2tbsp Soy sauce
3tsp Maggie hot and sweet sauce
1/2tsp Sambal Olek(Red chili+garlic paste) optional
or
red pepper flakes
1/2tsp Black ground pepper
1tsp Roasted Sesame seeds
Oil
Salt

Method:
1) Boil the noodles in ample water with salt. Cook till 'just' done.Do not overcook the pasta...it will get sticky.Stir occasionally.Follow the directions on the packet for how long to boil it(usually 8-10 mins)
2) Drain the pasta well and spread on flat dish. With oiled hand spread the pasta.
3) Meanwhile, in 3-4 tsp oil, fry the veggies on 'high' heat. We want to cook the veggies and still keep them crisp.Cook on high flame for only 2-3 mins.Do not over fry/ cook to make the veggies 'limp' and loose color.The veggies should be crisp and maintain good color.
4) Add the ginger -garlic paste and stir.
5) Add the noodles, sauces, black pepper, salt to taste (soy sauce is salty, so go easy on salt)
6) Garnish with chopped green onions and roasted sesame seeds.
7) Serve hot!!


Thursday, April 28, 2011

"Sweet Treats"- Chocolate Burfi

Last week was 'M's birthday.He has a sweet tooth and will eat anything and everything sweet! This 'burfi' was a surprise treat for him.
Ricotta Cheese has become my 'go to' ingredient for making Indian sweets. You can make-
Pedhas:
http://my-kitchens-aroma.blogspot.com/2009/10/treats-for-diwali-ricotta-cheese.html
Kaju- Pista Rolls:
 http://my-kitchens-aroma.blogspot.com/2010/11/ricotta-kaju-pista-rolls.html
Rasmalai:
http://my-kitchens-aroma.blogspot.com/2009/11/sweet-treats-no-big-deal-ricotta-cheese.html
Kalakand (yet to try) and many other sweets.


Chocolate Burfi recipe
Ingredients:
425 gms Whole milk Ricotta cheese
1 and 1/4th cup Carnation milk powder

2.5 Tbsp Cocoa powder
3/4th cup sugar
1/4th cup milk+2tbsp milk
1tsp ghee

1tsp Vanilla essence
Almond chips for decoration

Method:

1) In a non stick kadhai/skillet, melt 1tsp ghee. On medium to low flame add the ricotta cheese. Stir for about 15 mins. First the cheese will melt and then start getting thick again. This is similar to Khoya/ Khava.
Ricotta can burn easily. So, use non stick skillet and keep the flame low/medium!

2) When it starts leaving the sides of the kadhai, add milk, sugar and milk powder. Stir all together. Cook till it starts leaving the sides of the kadhai. This will take about 15 mins or so. The mixture will become thin first and then thick.The mixture should become like soft dough( thick enough to be able to be rolled)

3) Add the vanilla. Mix well. Take off the gas.

4)
Let it cool.In the cocoa powder add 1tbsp milk and make into smooth paste.If required add the other tbsp milk.But do not make the mixture too runny.
5) To 1/3rd of the Ricotta mixture add the cocoa powder and mix till well blended.
6) Apply ghee to the surface of a aluminum foil sheet.Spread the chocolate-ricotta mixture and roll with buttered rolling pin till about 1/2inch thick square/rectangle

 7) On top place the white ricotta mixture and roll gently.
8) Place a large platter on the white rectangle and flip to transfer the burfi onto the plate
9) Cut into squares and decorate with almonds
9) Store in refrigerator

Wednesday, April 27, 2011

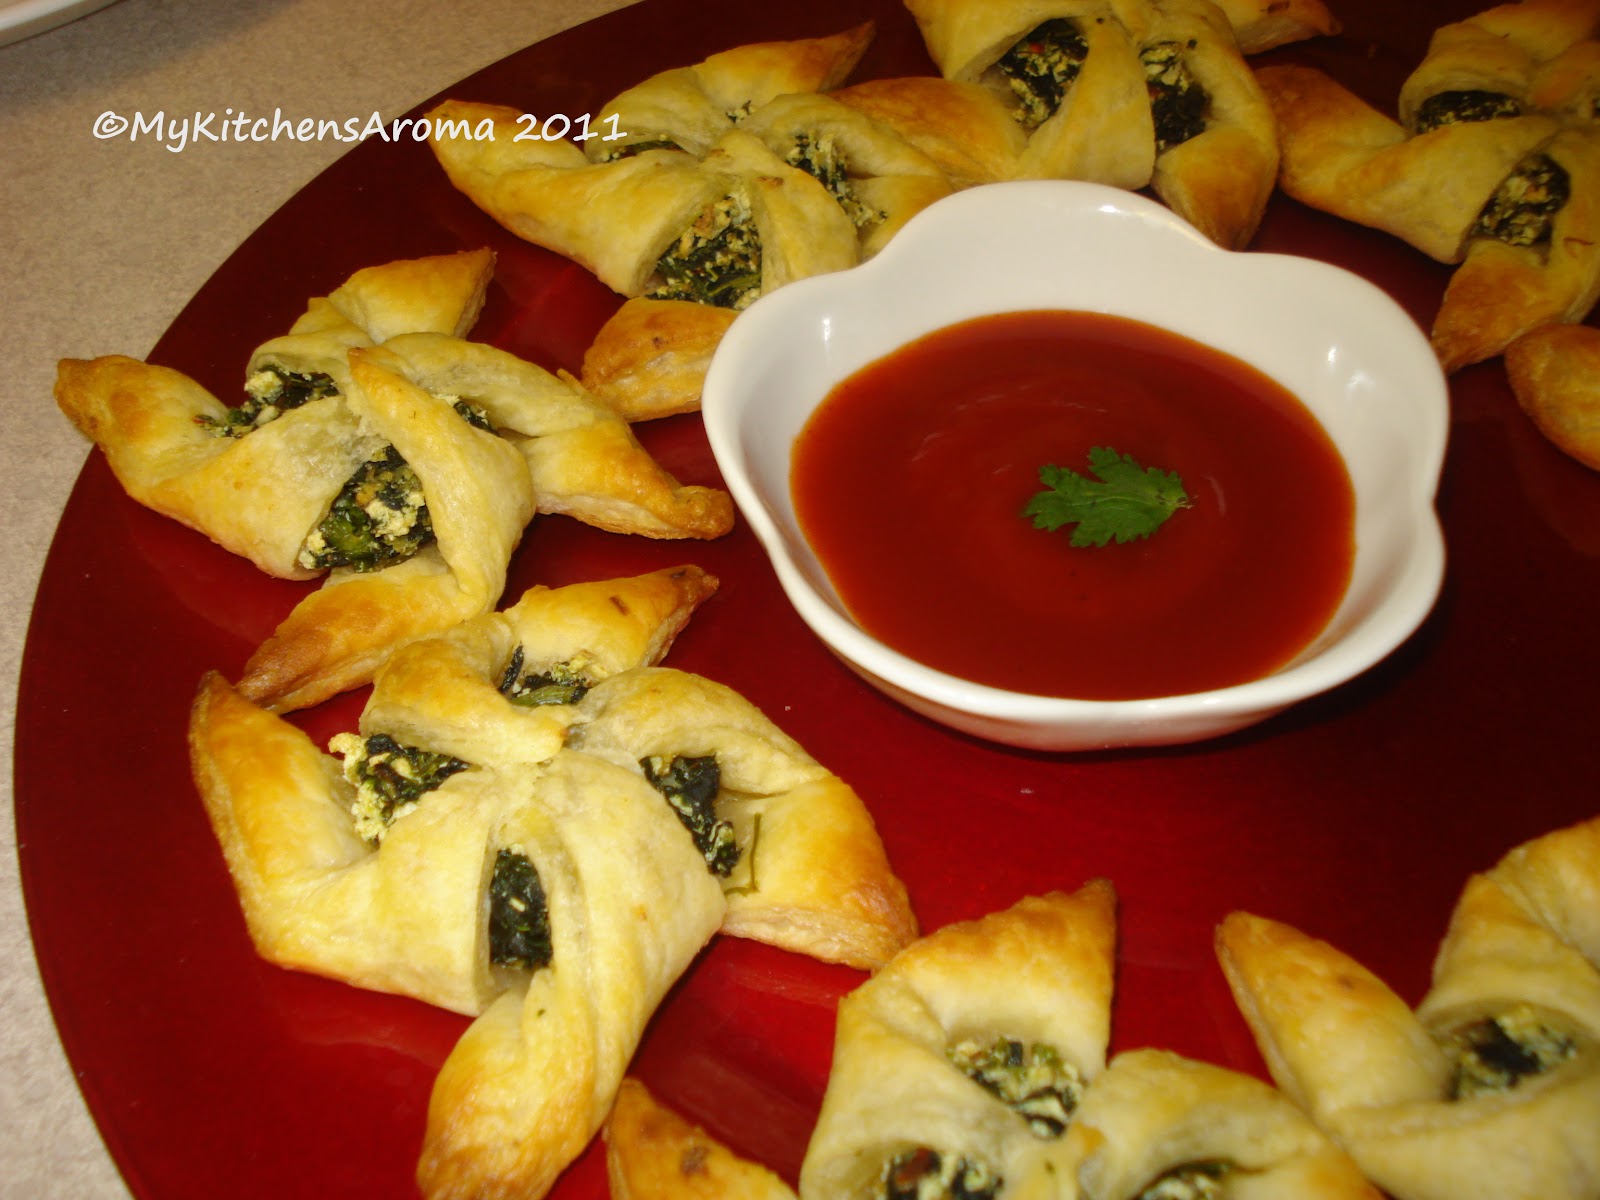
"Appetizers"- Paneer-Spinach Puffpastry Pinwheels


'Puff pastry' is my favorite 'tea time/ breakfast time/ snack time/ anytime....favorite thing to bake!!!!It is an 'Anytimetizer'!!! With all the help available from 'Pepperidgefarm'...baking Puff pastry is a breeze.
And you can use them is so many ways- change fillings, fold them in different shapes-
http://my-kitchens-aroma.blogspot.com/2009/11/appetizers-puff-pastry-pinwheels-with.html
or
http://my-kitchens-aroma.blogspot.com/2009/10/everyday-cooking-spinach-cheese-swirls.html
or
http://my-kitchens-aroma.blogspot.com/2009/09/everyday-cooking-veggie-puffspattice.html

 Recently I invited some families over for 'tea' on different weekends.' Puff pastry' was on the menu for each one of them.'M' actually joked that if they meet each other and talk about our meeting over 'tea', they all are going to find out that I made the 'same menu' for them !!!

Paneer-Spinach Pinwheels:
Filling:

1 and 1/2 cup Thawed,drained(well) frozen Spinach
1 cup grated Paneer
1/2tsp Garlic paste
1/2tsp Garam masala
1/2tsp Red pepper flakes
1 tbsp Bread crumbs(to soak any extra moisture in the filling)
salt


Method:
1) Squeeze the Spinach to remove all the water (you can add this water to soups, curries etc)
2) Mix all the ingredients.
3) Thaw the puffpastry sheets as on packet directions.
4) Fold and fill the Pinwheels-
Detail Directions:
http://my-kitchens-aroma.blogspot.com/2009/11/appetizers-puff-pastry-pinwheels-with.html

 5) Bake the Puffs at 350F till golden brown and crisp
6) Serve Hot with Maggie 'Hot and Sweet' Sauce. Enjoy!

Tuesday, April 19, 2011

"Appetizers"- Shrimp Pattice/Prawns in potato Patties

'M' and I had been friends for 5-6 years before we got married.Even then I did not know about his 'unlove' for prawns.After getting married I started to 'show' my cooking skills and one day I made these just before he came back from work.Now these 'pattice' are a delicacy in my moms home.We all would go head- over -heels when she made these.So when 'M' got home that day, I served these and waited for his reaction.I thought he is going to be sooo happy on me...
BUT....he took a bite and then he said...he can't have anymore!!I was in tears:( He then told me that due to the resemblance of shrimp/prawns with 'worms' he cannot eat shrimp.
Hence, now I make them only when I have other friends to share and enjoy these with me!
Ingredients:
For the shrimp filling
20-25 Small/Medium shrimp(cleaned, deveined, tails off)
1 large onion finely chopped
1tsp ginger garlic paste
1tsp Chicken masala/Kitchen king masala
1-2 tsp Red chili powder
1/2tsp Turmeric powder
1/2tsp cumin seeds
Cilantro
Oil
Salt

For the outer covering
2-3 potatoes boiled and mashed well,without any lumps.Grate them to get smooth mash.
1/2tsp garlic paste
1/4tsp Ajwain seeds/Cumin seeds
Salt
oil to fry
Bread crumbs

Method:
1) On 1tbsp oil fry the chopped onions till translucent and starting to brown.Add the cumin seeds, Ginger garlic paste and fry 1 min.Then add shrimp, spices,salt and cook till the shrimps cook and all the moisture evaporates. Garnish with Cilantro.
2) Mix mashed potato, salt, garlic paste, ajwain and make into smooth 'dough'.Make small balls with shallow center and stuff with 'Shrimp' filling. Cover completely with potato.
3) In a flat plate take bread crumbs.Place the Patties in the bread crumbs and coat on both sides.
4) Shallow fry on both sides till golden brown.

              Serve the Spicy Shrimp Patties hot with Maggie 'hot and sweet' sauce!

Monday, April 18, 2011

"Everyday Cooking"- Whole Wheat Tandoori Naan

My friend 'M' made this the other day for the Potluck.She said she learnt it from some friend of hers here in Columbus.I am sure this recipe is pretty much famous in Columbus now! It is one of those 'Wildfire 'Recipes that spreads from ear to ear!
"Naan' is a leavened flat bread. The only 'leavening' agent here is 'Yogurt' and these flat breads are made from whole wheat flour and in our 'Home Tandoors' that is Regular ovens! All these make them a BIG HIT! Not only that they bake in about 2 mins!!!

Ingredients:
2 cups Whole Wheat Flour/Atta/ Chapati Flour
1/3rd Cup Plain Yogurt/Dahi
1/2tsp Kasoori Methi(optional)
1/4tsp Ajwain/Oowa(optional)
Salt
water
Cooking spray
Butter

Method:
1) Mix wheat flour with yogurt, salt, ajwain, kasoori methi and knead into a soft dough with water.
2) Keep covered for 2-3 hrs.
3) Roll out the dough into oblong/ triangle / circle shape with 'light' hand. Do not press hard on the dough while rolling. Roll till about twice the thickness of a 'chapati'
4) Pre heat the oven to 'Broil' or to Max temp(like 500F)
5) Spray the cooking sheet with cooking spray/apply light hand of oil to prevent naan from sticking.
6) Bake for 1 min or so(till light roasted) then turn the naan and roast on the other side.The naan will fluff up and are done quickly.SO WATCH OUT..or otherwise they will burn.
7) Apply butter and serve IMMEDIATELY.
8) Serve with your favorite curry. I served them with 'Paneer Chettinad"!
http://my-kitchens-aroma.blogspot.com/2011/03/everyday-cooking-chicken-chettinad.html

Saturday, April 16, 2011

"Pat a Cake"- Rainbow Zebra Cake with Chocolate Ganache

'A' is already 10 months old! Can't believe how time flies. It won't say that it was just yesterday that she was born and now she is already this old....but even with all the hardships...it really feels that it wasn't long ago that we got her home finally from the hospital...after those long cruel 48 days....
Anyways....All is well in the end.

For her 10 month b'day..I decided to give 'Zebra' cake one more try.But this time is was going to be a  colorful....rainbowy....beautiful ..'RAINBOW ZEBRA CAKE'!!!
 http://www.sailusfood.com/2011/01/03/eggless-rainbow-zebra-cake/


For the  basic recipe,I followed :
http://www.azcookbook.com/zebra-cake/

I made little changes...
1) I used Red and green food coloring instead of the cocoa powder
2) Sprayed the cake with 'sugar syrup' for more moisture and 'sweetness'
3) Iced it with 'Chocolate Ganache

Here is how I assembled the cake:
1) Divide the white cake batter made by above recipe into 2 parts. In the 2nd part divide again into 2 parts.Add red coloring to one and green to the other.Mix well.
2) In the buttered 9 in cake pan add 3 tbsp white batter in the 'center' of the pan
3) On that add 2 tbsp of green batter in the center of the white batter
4) Again add 3tbsp of the white batter to the center of green batter.
5) Then add 2tbsp of the red batter to the center of the white batter.

6) Repeat 3tbsp White ..then 2 tbsp colored... then 3 tbsp white...till all the batter is used up.This is how the batter looks after assembly. The batter will spread on it's own.All you need to do is add the measured batter to the exact center of the pan.
7) To get a 'floral' appearance , run a toothpick from the center of the cake to the end on regular intervals.
8) Bake as directed in the recipe(http://www.azcookbook.com/zebra-cake/)
9) After cooling, spray with a 'Spray' bottle the following syrup:
Boil 1/2cup water and 1/4th cup sugar for 7-10 mins.Let it cool Add few drops vanilla essence.
10) Let the cake soak up all the moisture
11) Chocolate Ganache

http://www.joyofbaking.com/ganache.html


12) For decoration, add 'sprinkles' on the edge of the cake.Cut the cake into 'Wedges' to see the dramatic effect of the 'Zebra Cake'
                          
                              Happy 10th month Birthday my beautiful flower 'A'!!!