Popular Recipes

Showing posts with label cakes. Show all posts

Tuesday, June 16, 2020

Dark Chocolate Cake with Neon-Pink Whipped Cream Frosting


Special birthdays deserve special homemade cakes!๐Ÿ’• We had a special milestone birthday of our little one and celebrated with this very pink-princess like cake๐Ÿ˜Š

This year her demand was for a chocolate cake and hence baked a dark chocolate cake with neon pink colored whipped cream frosting. I love the stark contrast of dark chocolate with neon pink. The cake looks gorgeous in that combination!


Dark Chocolate Cake (Makes a small 6 inch cake)
1 cup All purpose flour
3/4 cup Sugar
1/3 cup Yogurt (whole milk)
1/3 cup Water
1/3 cup Unsweetened dark cocoa powder
1/4 cup Unsalted butter
1 Egg
1 tsp Bru instant coffee powder
3/4 tsp Baking powder
1/2 tsp Baking soda
1 pinch salt

1) Preheat oven to 350F. Layer 6 inch circle cake pan with parchment paper on the bottom. Coat with oil/butter on the pan sides and dust with some flour to avoid the cake sticking.
2) Beat butter, egg, salt and sugar till light and fluffy. Add yogurt, water and rest of the ingredients. Beat till well mixed. Do not over mix!
3) Pour into the loaf pan and bake for 30-40 mins. Check with toothpick. It should come out clean.
4) Let the cake cool completely.
( ** Or you can bake the cake the day before to save time)

Neon-Pink Whipped Cream Frosting
 (I add some cream cheese to stabilize the whipped cream and cut the sweet taste)
2 Cups Heavy Whipping Cream (chilled)
1/2 cup softened cream cheese
4 tbsp sugar (Add more for sweeter taste)
2-4 drops Neon Pink gel food color (Depends on desired color)
Pink and White Sugar pearls for decoration
(** This makes little extra frosting than needed. Any leftover frosting can be frozen in freezer safe containers)

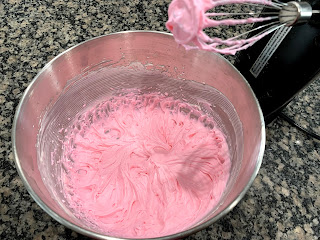
1) Beat the cream cheese, sugar and heavy whipping cream in chilled bowl till stiff peaks form.
Keep aside about 1/2 of the white icing in a bowl in the refrigerator
2) Add neon pink gel color to the rest of the icing and beat for few seconds. Fill in piping bag with large rosette piping nozzle and store in refrigerator till ready to use.

Cake Assembly:
1) Place the cake on serving platter/ cake stand that can be refrigerated. Coat the completely cooled cake with thin layer of white whipped cream frosting.This is called 'crumb coating' and helps with the next layer of smooth frosting without any cake crumbs. Keep the cake in the refrigerator to set for 30 mins.
2) Layer the cake with pink frosting on bottom and white of top and side. Smoothen it out with icing knife/ spatula.
3) Pipe rosette pattern with pink frosting on the top
4) Cover the entire top surface with rosettes. Decorate with pink sugar pearls on top and white sugar pearls on the bottom/sides
5) Refrigerate the cake after frosting/ decoration is done. Whipped cream frosting starts to soften at room temperature, so the cake needs to be stored in refrigerator.

Friday, April 24, 2020

Layered Chocolate cake with Whipped Strawberry cream


Family birthdays are super special and we love to celebrate the special day with homemade cakes. Homemade cakes are the most delicious of all cakes, isn't it? You can choose and control which and how much of the ingredients you want to add to make the cake your very own. I love to experiment and play around with different proportions and ratios of the ingredients and observe the effects on the resulting textures (That's the scientist in me talking๐Ÿ˜) I also feel, baking and cooking are very therapeutic for my mind and brain that is racing at 100 miles/hour usually ๐Ÿ˜œ. So here is the latest baking therapy from this week. Baked a small chocolate cake in bread load pan and then layered it with fresh strawberry whipped cream. Strawberries and chocolate go so well together and love the stark contrast in the layering pattern of dark brown and pink colors.


  • Cake:
1 cup All purpose flour
3/4 cup Sugar
1/3 cup Yogurt (whole milk)
1/3 cup Water
1/3 cup Unsweetened dark cocoa powder
1/4 cup Unsalted butter
1 Egg
1 tsp Bru instant coffee powder
3/4 tsp Baking powder
1/2 tsp Baking soda
1 pinch salt

  • Strawberry whipped cream:

1. 5 cups heavy whipping cream chilled
1/2 cup Strawberry puree ( Puree cooked with 3-4 sugar and till thick, strained and chilled)
1/3 cup powdered sugar
2-3 drops pink food color (optional)
Whip the cream till soft creams form with electric mixer. Add strawberry puree and powdered sugar and whip till firm peaks form. Keep refrigerated till ready to use.


  • Chocolate ganache drizzle: (Prepare at the time when needed)

4-5 Lindt dark chocolate squares, 2tsp heavy cream. Microwave for 20-25 sec till melted and smooth enough to drizzle.

1) Preheat oven to 350F. Layer bread loaf pan with parchment paper on the bottom.
2) Beat butter, egg, salt and sugar till light and fluffy. Add yogurt, water and rest of the ingredients. Beat till well mixed. Do not over mix!
3) Pour into the loaf pan and bake for 45-50 mins. Check with toothpick. It should come out clean.
4) Let the cake cool completely. Slice into 3 layers with large sharp knife.


5) Layer with strawberry whipped cream on the bottom layer. Place the cake layer and repeat for all layers.


6) Top the uppermost layer with whipped cream and drizzle with ganache on the sides


7) Decorate with whipped cream and fresh cut strawberries
8) Keep the cake chilled in refrigerator


9) Enjoy with your loved ones๐Ÿ˜


Monday, January 1, 2018

New Years Special Dessert- Icecream Cake!


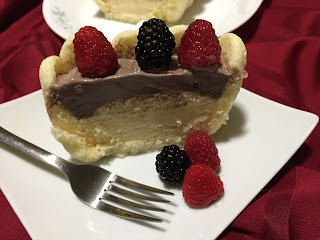
This is one of the easiest and prettiest dessert that you will ever make! My initial plan for New Years dessert was to bring some dessert shells and do some kind of berry sauce to go top of them along with ice-cream or homemade whipped cream. But as usual, no dessert shells to be found in the grocery store! But I did find 'lady fingers' (soft spongy mini cakes that are used in desserts like Tiramisu) and so came the idea of assembling a easy breezy beautiful Ice cream cake with Vanilla and Chocolate ice-cream layers and top with fresh berries. I wish I had used strawberry ice-cream instead of vanilla to give more color contrast to the cake.


What you need:
Lady Fingers- 2 packets
Vanilla ice cream (or Strawberry ice-cream will make it more colorful and prettier)
Chocolate ice cream
Fresh berries ( I used raspberries and black berries)
Loaf pan
Plastic wrap


How to assemble the cake:

1) Soften the ice-creams in the refrigerator for 1/2 to 1 hour.

2) Line the loaf pan with plastic wrap. Then line up the lady fingers on the side and bottom of the
pan.

3) Spoon the soften vanilla/strawberry ice-cream to cover the bottom and smoothen it out.Layer with few lady fingers. Then spoon in softened chocolate ice cream.


4)

Smoothen the top of the ice-cream. With a fork make lines on the ice cream top to make criss-cross patterns. Cover with plastic wrap and freeze the pan in the freezer for 3-4 hours.

5) When ready to serve, garnish with fresh berries of your choice.


6) Slice horizontally to cut and serve with extra berries! Enjoy the ice cream cake with your loved ones :)


Wish You All a Very Happy, Healthy and Delicious New Year!


Monday, September 4, 2017

"Rasmalai Cake" - An Indian version of the Mexican 'Tres Leches' cake


The newest trend in the world of cakes are the fusion cakes, where they combine best flavors from two or more cuisines to create one of a kind masterpiece. The one I tasted recently was the 'Gulab Jamun Cheese cake' at an popular Indian restaurant in Nashville,TN at the famous Chefs restaurant- Chauhan Ale and Masala house.Another beautiful cake was baked by a contestant at the cooking competition here for the Ganesh festival.The cake was called 'Gajar Halwa' cake- White moist cake with layers of gajar halwa and whipped cream made it delectable! She won the first prize:)


A friend had send a picture of the new popular cake in Pune- "The Rasmalai cake". Since then, I wanted to try my take on this cake and  we had the perfect occasion on this weekend that deserved a special cake! A 70th birthday party!

Here is my version of the Rasmalai Cake which is a spin on the Mexican 'Tres Leches' cake.


Ingredients:
Step 1: Plain Sponge Cake 
*You can prepare the base Sponge cake from scratch with this recipe. Instead of vanilla, add 1/2 tsp cardamom powder 

OR For Easy version- Use Cake Mix 
1 eggless cake baked in a glass tray (I used Pillsbury white cake mix to bake the cake. Prepared the cake as per instructions, but substituted eggs with ¼ cup Greek yogurt)


Step 2: For Malai/ basundi 3 milk soak
1.5 cups evaporated milk
0.5 cups condensed milk
0.5 cup whole milk
0.5 tsp cardamom powder
¼ tsp nutmeg powder
(For more sweeter taste add more sugar/condensed milk. But remember the cake itself will be sweet too!)

Step 3: Saffron whipped cream:
1.5 cups heavy whipping cream
4 tsp powdered sugar
1 tsp saffron

Garnishing
8 Rasagullas (I used store bought)
Few drops of yellow coloring (optional)
Chopped pistachios and almonds for garnish
Saffron for garnish

Method:
1) Prepare cake as per box instructions. Use Greek yogurt to substitute the eggs. Let the cake cool completely.
2) Prepare the malai/basundi by boiling the evaporated milk, condensed milk and whole milk along with cardamom and nutmeg powder. Let it cool completely.
3) Pour the Basundi over the cooled cake.Let it soak overnight in the refrigerator.


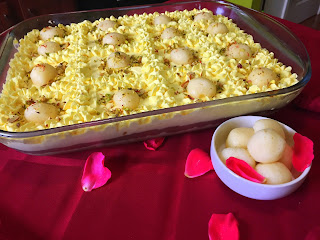
4) Whip the cold heavy whipping cream with a electric mixer with the powdered sugar and 4 tsp milk with saffron strands.If the color is not yellow enough, add few drops of yellow food color. Beat till stiff peaks appear

5) Pipe the saffron whipped cream on the milk soaked cake in desired patterns. Garnish with half sliced rasagullas, chopped nuts and saffron.

6) Chill in the refrigerator for few hours. Serve chilled.


Enjoy the delectable moist cake with luscious whipped cream and warm and delicate Indian flavors of cardamon, nutmeg and saffron!


Tuesday, July 26, 2016

Eggless Rava Cake

Simple Pleasures.....


Who remembers the simple eggless 'rava' cake that mom used to bake?? 
Recently, I baked one myself and loving every crumb of it ๐Ÿ˜‹


So easy to make, yet so tasty and versatile... Can be a tea time snack, a kids snack or a fancy dessert when you drizzle with chocolate syrup or serve with ice-cream!! 


Recipe:
1 cup rava
1/2 cup whole wheat flour
1/2 cup all purpose flour
1 cup powdered sugar
1/2 cup yogurt
1/2 cup oil
1/4 cup milk
1 tsp baking powder
1/2 tsp baking soda
1 tsp vanilla essence
Chopped nuts optional

Method:
Preheat oven to 350F. Oil a loaf pan.
Mix yogurt,oil,sugar with a whisk. Add the rest of the ingredients and mix. Pour into the loaf pan. Add the chopped nuts. Bake at 350F for 30-35 mins till golden brown. Cool before cutting. Enjoy ๐Ÿ˜‹


Sunday, June 14, 2015

"Princess Cake"


It was 'A's 5th birthday and she is in LOVE with princesses.I love princess this... I love princess that... is in daily conversation at least 10 times a day!

I had decided I wanted to make her a 'princess cake', but just wasn't sure how that is going to work on a week day evening of her birthday. All the previous versions I had seen of the cake called for special molds to make the evening gown like shape, or then bake 3 different cakes and carve them into evening gown like shape.All those seem too labor intensive.

As I was driving back from work...(it is 'me' time and my thinking time for me :)) I had an idea of this 'semi homemade' version of the cake:

I picked up a small chocolate 'bundt' cake from the grocery store, some strawberry icing and some sugar pearls and made this fabulous looking 'Princess Cake"


You need:
1) A small chocolate bundt cake (dome shaped cake with a hole in the center)
2) A princess doll (Check for the height of the doll or use only the upper body)
3) Some strawberry icing
4) Sugar pearls

Method: 

1) Place the doll in the center of the baked bundt cake in the hollow portion.Secure with tooth picks and icing if needed. I did not have too.


2) Decorate the Bundt like a princess gown as desired with icing and sugar pearls. 

3) You can decorate the upper princess portion with some icing to match up the gown

Done!!

Thursday, July 17, 2014

'Chocolate-Walnut-Cherry' Bread

I hadn't baked in a really long time.The new loaf pan that I bought like a month ago...still had it's label
unmoved. I thought a 'quick' bread would be a good idea and will solve the 'what to give for snack' for the next few days atleast :)
This bread is not a 'bread' in real sense.But is something in between a 'cake' and  'bread'.It has a dense texture and a crusty top. Made with 'dried cherries'...it gives it a tangy surprise in between bites.


Ingredients:
1.5 cups All Purpose flour
3/4 cup Sugar
6 tbsp unsalted butter
2 Eggs
1/2 cup chopped walnuts (plus few whole for topping)
1/2 cup Dried cherries
1/2 hot water
1/4 cup Dark cocoa powder
1/4 cup Chocolate chips
1 tsp baking powder
1 tsp vanilla essence
1/2 tsp baking soda
1/4 tsp salt

Method:
1) Pre heat the oven to 350 F. Grease/coat a loaf pan with cooking spray and flour. Soak the dried cherries in hot water for 15 mins.
2) Beat the butter till fluffy.Add eggs and salt and beat till light.Add the sugar and beat for couple more mins.
3) Sieve together flour,baking powder and baking soda.Add few tbsp at a time to the butter-eggs mixture.Mix together.
4) Add the soaked cherries along with the warm water it was soaked in, chopped walnuts,chocolate chips,vanilla and mix completely
5) Pour into the loaf pan, garnish with walnuts and bake at 350 F for about 40 mins. Check with toothpick to see if the center is baked.
6) Remove from the pan and cut when cooled completely.
Serve as snack or dessert along with vanilla ice cream!