Popular Recipes

Friday, December 4, 2009

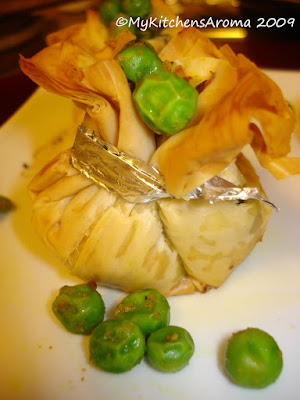
"Appetizers" -Phyllo 'Potlis' with Spiced Green Peas


I know what you are thinking...."She is obsessed with 'Phyllo dough'! Actually it  is not a 'obsession' but more of a 'fascination'.....how many different ways can I use the Phyllo dough! I am just experimenting with shapes, fillings, toppings, tastes- sweets-savories etc. And since I still have half of the phyllo dough sheets still sitting in my refrigerator...you may expect to see more of 'Phyllo' recipes!
Anyways...
Last afternoon, I was thinking what shape to go for today... And I remembered the 'Potli' style bags famous in India.They come in all different colors, sizes with pretty bead work and fancy strings.They are really  very pretty!Perfect I thought! I could do that! I can mold the phyllo into little 'Potlis' and stuff them with spicy green peas filling!

Here is the recipe:
For the Phyllo Dough
 6 sheets of Phyllo dough thawed at room temperature
1/2 tbsp butter melted
1)Place 1 Phyllo sheet on  a flat surface.Brush butter on the surface.
2) Place the next sheet on top.Press flat gently.Apply butter.Repeat for all 6 sheets.
3) Cut into 6 squares of equal size. If you want 'bigger' Potlis cut into 4 squares.
4) Keep covered with moist cloth untill ready to use. They dry up fast!

Spicy Green Peas filling
1 onion finely chopped
1 tomato finely chopped
1 cup frozen green peas
1/2tsp garam masala
1/2tsp cumin
1/2tsp mustard seeds
1/2tsp cumin-coriander powder
1/2tsp Chili powder
1/4tsp turmeric
salt
oil

1) Heat oil in a pan.Add mustard seeds amd let them splutter.Add the cumin seeds,onion and fry till golden colored.Add the tomatoes and rest of the spices.Fry 2-4 mins
2) Add the green peas and salt and fry again till the filling dries up.Let it cool

Phyllo Potlis assembly
1) Take 1 square of layered phyllo dough.Place 1 spoonfull filling in the center.
2) Pull up all corners gently and make into 'Potli'/Pouch.
3) Tie with 'Aluminun foil strips' or green onion leaves.I used aluminun foil strips.
4) Place on baking sheet and bake at 400 F for 20-25 mins untill the 'Potlis' turn Golden brown on all sides.
5) Serve warm with Ketchup/ Hot and sweet suace.Untie the aluminum foil before serving OR for more 'Interest' let your guests untie the 'Potli' before eating.


Untie the 'Potli'...Bite into the crisp buttery Phyllo dough and savor the Spicy green peas!

Wednesday, December 2, 2009

"Everyday Cooking"- Chicken Frankie/ Chicken Kati Roll


There are so many famous street foods in India that are amazingly delicious, mouthwatering, sometimes healthy too! Because of 'mingling' of the cultures, 'what originated where'...is a big question! In Maharashtra..the famous Dabeli (Origin:Gujrat), Pani poori/Bhel(Chaats) (Origin: Delhi), Chinese food (Origin:China), Vada Pav (Origin: Mumbai), Misal Pav (Origin: Kolhapur), Dosas/Uttapa/Vadas(Origin: S.India) are some of the famous street foods. Also famous is the Kati Rolls/ frankies.I still do not know why they are called 'Frankies' but just found out that the 'Kati Roll' originated in 'Kolkatta'! Did not know that! Wikipedia says: Kati roll is street-food originating from Kolkata, India. Its original form was a kati kabab enclosed in a paratha, but over the years many variants have evolved all of which now go under the generic name of Kati Roll. Today, pretty much any filling rolled up in any kind of Indian flatbread is called a kati roll.
Last week I made my mom's Veggie version of the Frankies and this weekend I thought I will give my friend 'P' the taste of Maharashtrian street food (Had not quite realised the origin is 'bengali' though!!)  when her family comes over for lunch! Anyways..that doesn't make the 'Kati Rolls' any less delicious....and we all enjoyed the spicy-tangy chicken wrapped in wheat chapati/paratha.
Ingredients:
For the Chapatis/Tortillas/Wrap
They are usually made with 'All purpose flour' and little whole wheat flour added to it.But my mom and hence me.... prefer to use the 'whole wheat flour'.
1 cup Whole wheat flour (if you want all pupose flour add 1/2 cup whole wheat flour+1/2 cup all purpose flour)
2tsp oil
salt
(2 Eggs beaten) +salt and little chili powder)-needed when assembling the Kati roll
Mix flour,oil , salt and knead into a soft dough with water.
Roll out the dough into circle thin chapatis/tortillas.Roast lightly on hot flat pan/tava.The chapati will finish roasting after the filling is filled.

For chicken filling:
1 lb Boneless chicken cut in small pieces
2 onions chopped
1/4cup crushed tomatoes
1/2tsp ginger garlic paste
1/2tsp Chicken curry masala
1/2tsp cumin-coriander powder
1/2tsp cumin
1/2tsp turmeric powder
1/2tsp chili powder
1tsp Mint paste
chopped cilantro
oil
salt

For topping: Onions,Green Pepper,Red Pepper sauted with salt and black pepper

Method:
1) Marinate chicken pieces in ginger garlic paste, mint paste, turmeric, chili powder etc.Keep aside for 1/2hr.
2) Heat 1tbsp oil, add the onions.Saute till brownish.Add the tomato paste and saute till nicely fried.
3) Add the marinated chicken and other spices. Cook till all the juices dry up and chicken is tender.
4) Garnish with chopped cilantro

For my 'SECRET' chutney:
This one is my favorite quick chutney. It's tangy-spicy-minty.Goes well with Samosas,Vadas, most appetizers etc. Its color is brown and so most people think its 'tamarind' chutney.But actually it is just 'Jazzed up Ketchup!
1/2cup tomato ketchup
1tbsp Maggie hot and sweet sauce
1tbsp Mint paste
1/4tsp chili powder
1/2tsp sugar
1/2tsp chaat masala
salt
Mix everything together and your chutney is ready!

Assembling the Kati Rolls:
1) Brush the wheat chapati with beaten egg mixture and put on oiled pan/tava (the egg side down) Let the egg cook.Take off the heat. Apply the above chutney liberally on the egg side.The egg side will be inner side of the roll.
OR
Make thin egg omlettes first and place them in the wheat chapati/paratha.
2) In the center add 2 spoonfulls of the chicken, onions and peppers and fold into a roll.Secure with tooth pick if necessary.
3) On heated tava/pan apply little oil and warm up the roll, till golden brown.
4) Wrap half way in foil/paper.
5) Serve hot with or without the chutney/raw onions etc.

Monday, November 30, 2009

"Sweet Treats"- Phyllo cups with Yogurt and Fruits

The long weekend was very much relaxing.We did not travel anywhere....but.....met friends, ate, watched movies, slept.Sometimes.... that is all what you are looking forward too!
So, we were going to have 'P-V-K' over for lunch yesterday.I planned a simple menu and a simple dessert.
It's fun to keep it 'casual' when you have friends over. That way everyone is comfortable and relaxed.
Sometimes 'simple' foods are the ones which are comforting and give pleasure.Infact as kids.....even a small 'M and M' or 'Bread and Jam' sandwich is all you need to get a smile on that face! It is so easy to make kids happy.I have seen 'E' enjoy the 'simplicity' of life! Happinesss comes to him in 'simplest' things!
And that's true.....as they say: Life's Greatest pleasures can often be the 'Simplest' ones!
So....
I put together this 'simple' dessert to end  the meal. It is very easy, quick, 'not too sweet' and looks very pretty! Love the crunch of the phyllo cups and contrast it gives to the smooth creamy texture of the yogurt!

Ingredients:(For making 6 cups)
6 sheets of Phyllo dough ( thawed to room temp)
1tbsp melted butter
2 cups flavored yogurt of your choice (I used 'Raspberry' and 'Vanilla' flavors)
1/2cup Pineapple cut into small pieces( I used 'Dole' canned pineapple)
1/4cup Pomogranate

Method:
1) Carefully unfold phyllo sheets.They are paper thin, so be gentle.
2) Place 1 sheet on a big flat surface.Brush lightly wth melted butter.Place 2nd phyllo sheet on top.Smooth out.Brush with butter and place the next sheet.Repeat for the remaining sheets.
3) Cut out 6 squares from sheet and place them in 'muffin' pans, to create 'cups'.


4) Bake at 350F for 15 mins till the cups are golden brown in color.Let them cool.
5) Just before serving: Place 2-3 spoonfulls of yogurt in the cups, top with fruits.

6) Dig in the crisp phyllo cup and enjoy the  'crunch' along with 'smooth creamy cold sweet ' yogurt and fruits!

Sunday, November 29, 2009

"Everyday Cooking"- Spaghetti with Mushrooms

Looking for something simple for dinner??? Oh ....I get lazy many times and want to cook something quick  n' easy. If 'M' has to cook something quick and easy.... many a times its either 'Upma' or 'Rice+daal" or "Daal and bread" and the easiest of all....call ***-***-PAPA ie order pizza from Papa Johns!!! How easy is that! Hahah! Apart from the joke....I really appreciate him taking over the kitchen and putting together a nice simple meal for us! The 'thought' counts....
 Last week we had pizza for dinner....so yesterday night when the BIG question came..'What to make for Dinner???' I quickly decided to make this 'Spaghetti with Mushrooms'.
Ingredients:
2 handfull thin spaghetti
1 cup sliced mushrooms
1/2cup crushed tomatoes
1tsp crushed garlic
1/2tsp Italian seasoning
1/2tsp fresh/dried Basil
1/4tsp black pepper
1/4tsp red pepper flakes
1/4 cup Parmesan+ Romano cheese grated
1/2tsp sugar
salt
olive oil
Cilantro/Parsley for garnishing

Method:
1) Cook the spaghetti in salted water till 'al dente'
2) Heat 2tsp olive oil, add crushed garlic.Fry for few seconds and add the sliced mushrooms.Fry till slightly browned.
3) Add the tomatoes, spices, salt, pepper  and sugar.Cook for 3-4 mins.
4) Drain the spaghetti well and all to the pan with tomato+ mushroom sauce.
5) Top with parmesan-romano cheese, red pepper flakes and parsley.And extra drizzle of olive oil if you like!
6) Serve hot !
Enjoy with hot Italian vegetable soup or a crunchy appetizer like Bruschetta.