Popular Recipes

Wednesday, December 30, 2009

"Everyday Cooking"- Sabudanyachi khichadi /Sago Stir Fry


One of my most favorite foods....and how did I not blog about it for soooo long?????? Haven't met a 'Maharashtrain' yet ...who does not like 'Sabudanyachi Khichadi'. It's everyones favorite! Though everyone might have a little 'choice'  how they like it done. Like my sister..prefers it not so well done. She says the Sago should still look little 'Whitish'. Others may like it cooked well..where the Sago turns translucent.I like mine...in the mid-way.Not so white but not totally translucent either. There is a 'technique' involved.Perfect soaking of the sago, the way to stir fry it, how long to cook it....  The Sago should be cooked.... but not so much that it starts to stick together and become rubbery and chewy.So making 'Proper' Khichadi is an 'art'! Each individual sago pearl should remain separate....That's the perfect version!

Sago khichadi  is mostly made during 'Fasts' ( Hindu religious fasting).....but can be enjoyed on any occasion ...as in our home.'M' and I both loveeeeee this khichadi. It is our weekend breakfast/Brunch. We have always loved the way it is made for 'fasts' and haven't really tried adding any other ingredients like...onion/ mustard seeds/ turmeric etc. We like the way.....just as we have had it throughout our childhood.
Here is the recipe of our childhood.....adulthood...all time favorite!!!
Ingredients:
1 cup soaked sago(method follows)
1/4 cup boiled potato chopped
1/4 cup crushed roasted peanuts (coarse powder)
2tsp cumin seeds
2-3 green chilies cut
1tbsp ghee ( for the 'real' taste) / oil / butter
salt
sugar (1/4tsp or so)
Cilantro, fresh grated coconut, lemon juice for garnishing

Method:
1) Wash Sago with cold water twice. Drain 'almost' all the water off.Keep little water in the sago (may be 1/4 inch on top of soaked sago).Let it soak for 4-5 hrs or overnight(preferably overnight).The Sago should plump up and look like individual pearls.It should not be 'wet' to touch.
2) Heat the ghee in a kadhai, add cumin seeds, chilies and boiled potatoes.Fry for 1-2 mins.
3) Add the soaked Sago, peanut powder, salt. Mix well on medium flame.
4) Keep stirring to avoid lumps in the sago. Add sugar(just little  for taste)When the sago starts turning little translucent, turn off the heat.Otherwise it will start clumping together.Take off the heat.DO NOT COVER SABUDANA KHICHADI WITH LID while cooking.It will become sticky.

5) Serve IMMEDIATELY...nice and hot ...topped with cilantro, fresh coconut and squeeze of lemon juice.
6) It is also served with cool 'cucumber raita'- Finely cut cucumber in Yogurt .
 (A famous dish is Pune is called 'Kakdi Khichadi' meaning 'Cucumber and Sago Khichadi'). This place that makes and sells it....makes hundreds of plates of this 'Maharashtrian' favorite everyday.....

Tuesday, December 29, 2009

"Appetizers"- Thai Stir Fried Tofu


I am like the person who can eat 'Everything'...well almost! What I mean is...I like to try different foods and my palate is appreciative of various tastes. My little 'E' is learning to eat different foods and getting to know different tastes. I am surprised ( touchwood!) he even likes vegetables like cabbage, eggplant, cauliflower that I did not care for when I was a kid!!! I have seen, he likes well seasoned food......may that be Indian,Italian,Chinese or anything else. I was sure he wouldn't like plain Tofu or things like Tofu milkshake. So I made this tangy yummy appetizer and he loveeeeddd it! (Ofcourse without the peanuts...coz he gets a rash sometimes after eating peanuts)


Ingredients:
1 cup 'Extra firm' Tofu cut into bite size cubes
1/4 cup Onion cut into bite size chunks
1tsp Pad thai sauce
1tsp soy sauce
1/2tsp ginger garlic paste
1/2tsp ketchup
1/4tsp red chili paste/hot sauce/red pepper flakes
1 pinch black pepper
1tbsp coarsely crushed peanuts
cilantro for garnishing
salt
oil

Method:
1) Dab the cut tofu on paper towel to remove extra moisture
2) Heat little oil in non stick flat skillet. Lay the tofu on the heated oil.Let it brown on one side.Then turn on other side.
3) Add the ginger garlic paste, onions and stir fry on high heat.The onions should remain crisp.
4) Add all the sauces, black pepper and mix well.Turn off heat. Check for salt (as soy sauce is salty)
5) Garnish with peanuts, cilantro.
5) Serve warm as appetizer or as a side dish along with Fried Noodles/ Rice etc.


Saturday, December 26, 2009

"Fusion Cuisine'- Methi 'Ricotta' Mutter

'Ricotta cheese' isn't my refrigerator staple,but I am seeing that I am buying it more often than before and experimenting with it. It is a not 'real' cheese, has very creamy texture and blends well in both sweet and savory dishes. More so....I have started using it in Indian cuisine..making Pedhas, Rasmalai and now this -Methi 'Ricotta' Mutter.....which is as you all might know....a variant of  Methi 'Malai' Mutter.
Fenugreek/Methi has a distinct 'bitter' taste to it. If the bitterness in not your favorite..and you prefer mild tasting curries....this one is a good choice.
Last week, couple of my friends went to NY city for a weekend trip.I had asked them to get me some fresh methi from the Indian Grocery store.'M' isn't a big fan of just stir fried methi......so I thought I will make 'Methi-Mutter' but with Ricotta instead of the 'Malai'.

Ingredients:
1 and 1/2 cups cleaned chopped methi leaves
1/2 cups frozen green peas
1/4 cup chopped onion
2tbsp Ricotta cheese
1tbsp milk powder
1 cup Milk
2 tsp ketchup
1/2tsp cumin
1/2tsp cumin-coraineder powder
1/4tsp chili powder
1/4tsp garam masala
1pinch black pepper
1 pinch nutmeg
1bay leaf
1tsp ghee/butter
1/4tsp sugar
salt

Method:
1) Heat ghee/butter.Add cumin, bay leaf.Add onions saute till translucent.Add the chopped methi.Saute 2 mins
2) Add the milk, all the spices, milk powder, ketchup and let the methi cook on low flame
3) Add green peas and Ricotta cheese. Mix well.Let it boil for 2 mins.The curry is pretty thick.
4) Serve hot with naan/roti/rice.

Wednesday, December 23, 2009

"Everyday Cooking'- Kobi chi vadi/ Steamed cabbage and gram flour rolls


Ever wonder what to do with that BIG cabbage head you buy at the grocery store? It lies in my refrigerator for an awfull amount of time.Last week after buying the cabbage.....I used the cabbage to make 'Bhaji' , then in chinese type stir fry, in fried rice, in mix veg soup....but still some was left. I remembered the 'Kobi chi vadi' my mom used to make. It is nothing but cabbage, gram flour mixed together....kneaded into rolls, steamed.....cut into discs...and shallow fried. It doesn't feel that there is 'cabbage' in there and is a sure winner for those 'Cabbage dislikers' out there.
Couple months ago I tried a different version of this, but this time decided to stick with the 'known simple' version of it. They came out really good.....I was snacking on those all day long!!!
Ingredients:
1 cup cabbage finely chopped
1 and 1/2 cups Gram flour/ Besan
1tbsp corn flour
1tsp garlic ginger paste
1/4 cup roasted sesame seeds
1tsp tamarind extract+ 1tbsp jaggery mixed in little water
1/2tsp turmeric
1tsp chili powder
1/2tsp cumin seeds
salt
oil

Method:
1) Mix together cabbage, Gram flour, corn flour, turmeric, cumin, chili powder,sesame seeds, ginger garlic paste,salt etc. Knead with the tamarind-jaggery water. The dough is very sticky.Add only as much water as necessary to make semi soft dough. If dough is too hard, vadis will be hard and dry.If too soft, it will be hard to make into logs.
2) With oiled hands, roll the dough into log shape.
3) Place the logs into oiled vessels.
4) Steam in pressure cooker without whistle for 20-25 mins.Let them cool.

5) Cut out thin slices/ discs from the cooled roll.
6) Shallow fry in oil untill golden brown and crisp .
7) Garnish with roasted sesame seeds and serve warm with ketchup.

Monday, December 21, 2009

"Everyday Cooking"- Tomato-Parmesan Soup


Of the many things you cannot 'do' after having a baby ...some are.....watching a movie in a theater, eating out 'peacefully'....going out whenever 'you' want to!
'M' and I haven't been to a theater, to watch a movie together, since 'E' was born ( And 'E' is now 2and 1/2 yrs old!).We 'try' to eat out...but it is no where 'peacefull'.We have to take turns eating and entertaining 'E'...it's a Big venture!!!
So.....since 'E' started pre-school from September this year..I started dreaming on- how I would utilize the time I have 'off' and what all we could do! Those 3 hrs (9am to 12pm) were going to be 'ours'.
I made plans..once 'M' and I can go for a movie...or may be just for a 'brunch' to some Cafe. My first plan ..of going to a movie failed....as there are no shows from 9am to 12 pm in Regal Cinema,Ithaca.What a bummer! But we did work on our next plan....
Lat week 'M' took a morning off from work....we went to this place called 'Hope's Way Catering and Cafe' nearby.They have many 'brunchy' items on menu-soups, pastas, salads,scones, muffins,pound cakes,coffee cakes etc etc.Also, they are famous for their incredibly yummy desserts.
We tried this 'Tomato-Parmesan' soup on that snowy- wintry morning.The soup was nice and creamy, had a pinkish hue.It was amazing to sip on warm soup, in the cozy Cafe.....especially 'M' by my side....
I tried to make 'similar' soup at home this week...and it came out pretty good!
Ingredients:


2 Ripe tomatoes chopped
2 cup milk
1/2 cup grated Parmesan cheese (I used Parmesan-Romano cheese)
1tbsp crushed tomatoes/ 1tsp ketchup
2 tsp All pupose flour
1tsp butter
1tbsp onion finely chopped
1tsp Italian seasoning
salt
sugar
Black pepper
Red chili powder

Oyster Crackers/Croutons/  Bread to serve along

Method:
1) Heat 1tsp butter in a sauce pan. Add the chopped onions.Fry till translucent.
Add the all purpose flour .Fry for few seconds.
2) Add the milk and mix well. Let the flour cook and the 'sauce'/ soup thicken up.
3) Add the tomatoes, seasoning, black pepper, sugar , chili powder, crushed tomatoes and let it simmer.The soup gets a 'pinkish' color.
4) Add the grated cheese. Mix well. Check for salt. Cheese is pretty salty, so add salt after tasting.Adjust consistency with milk/water.
4) Serve warm with Oyster crackers/ Croutons/ Bread.


Sip on the warm,creamy soup with tomatoes with the warmth of black pepper and chili powder!

Friday, December 18, 2009

"Sweet Treats"- Chocolate-Walnut Fudge

'Fudge' was a rare treat for us in India. Most of the Fudge I have eaten in India, came from 'Lonavala'.This is hill station and picnic spot in Maharashtra. My school picninc went twice to Lonavala and that's when, one friend of mine, introduced me to 'Chocolate Fudge'.It was an instant addiction...loved the chocolaty-chewy fudge with occasional crunch of walnuts! Since then, everytime I went to Lonavala....I had to stop by for the Fudge!
Since coming to USA, fudge hasn't been a rare treat at all! You find it everywhere....and in so many different flavors...you can't imagine! This time..I thought instead of buying..I am going to give it a try....and make it myself!
I made it in two layers....Chocolate-Walnut layer topped with 'burfi' like white layer....
Need I say.....it looks pretty and tastes yummlicious??


Ingredients:
1 -14Oz can Sweet condensed Milk
1- 12 Oz semi-sweet/dark chocolate morsels
5tbsp  butter
1/2cup Milk powder
1tsp Vanilla essence
3/4 cup chopped toasted walnuts
1 tsp sugar

Method:
1) Toast the walnuts in oven at 350F for 7 mins.Let them cool
2) Line a square pan with aluminum foil. Leave excess foil on all four sides, to make it easier for removing the fudge.
3) Make a double boiler- Heat a big pot of water.On top place a little smaller glass/metal vessel which will fit snugly on the big pot.The steam from the big pot should heat this small vessel.
4) For 'Burfi' like white layer-In the double boiler, add 1/4 can condensed milk, 1/2 cup milk powder, 2 tbsp butter,1tsp sugar. Let it cook on the boiler and stir continously. Cook for 3-4 mins till everthing comes together and becomes sticky.Take off the boiler.Add few drops of vanilla essence.
5) Spread this mixture on the pan lined with aluminum foil.Spread into thin layer and let it cool.
6)For Chocolate-Walnut layer- Place another glass/ metal vessel on double boiler.Add almost all the chocolate morsels(keep handfull aside for decoration later), the remaining condensed milk and 3 tbsp butter.Let the mixture melt gently on double boiler and stir continously.Make sure it doesn't burn.
7) The chocolate morsels will melt and the mixture turns 'shiny' .Cook for 3-4 mins.Add walnuts, vanilla essence.Mix.
8) Layer this hot mixture on top of the 'white burfi' layer. Smooth the top side.Let it sit at room temp till it cools down.
9) Refrigerate 1-2 hrs.
10) Carefully remove the hardened fudge from the pan.Peel off the aluminum foil carefully.Turn the fudge up-side-down so that the white layer is on top now.

11) Cut into squares with a  sharp long knife.Wipe the knife with wet paper towel, in between the lines.
12) Press the left over chocolate morsels onto the white layer for decoration.
13) Store the fudge in refrigerator.

Indulge into ultimate 'chewy chocolaty' fudge with occasional 'walnuty' crunch!

Wednesday, December 16, 2009

"Aroma from a Guest Kitchen" - (Guest:Padmaja Vaithi)= Grilled Chicken And Roasted Red Pepper Sandwiches with Fontina Cheese

Aroma From a Guest Kitchen :
In this new segment I will be asking my Friends/Guests/Contributors to share their Kitchen creations, recipes, thoughts..... with all of us here.

Today's Guest : Padmaja Vaithi
My good friend from Ithaca,NY who shares a passion for food with me, is an awesome baker (we can ask her for her cake recipes for future contributions!) and a very good person...ofcourse!

Padma Says:
Almost every weekend I prepare the menu for the following week, before I go to do my grocery shopping. If that week’s menu is not on my kitchen board, Monday’s lunch is bread. (For my husband)
Having the menu planned ahead helps me include all food groups and different cuisines, group meals with intense labor with least work and also in sync with day to day activities, makes me work faster and more effectively…… especially with the prep work and a lot with my catering.
This week, as always I put out the same question to my husband “What do you want for next week?” Instead of his usual “whatever” or “observed silence” he said Chicken Sandwich with ………..some ingredients that randomly popped out of his mouth…………..I looked at him for a moment as if asking “Does this even make sense or are you just mocking at me?” Studying that LOOK ………which I’m sure is every wife’s weapon he said “Come on, surprise me.”

Well that is very easy for me; I could just send an empty box for lunch. What could be more surprising than that? (As suggested by my younger sister.)

However, I didn’t have to try too hard either. I have this faithful binder full of recipes cut out from magazines and sorted into groups : JUST FOR KIDS, CAKES, DESSERTS, PASTA, ONLY CHICKEN………..there must be a Chicken Sandwich recipe in here somewhere and sure there it was.
"Grilled Chicken and Roasted Red Pepper Sandwich with Fontina Cheese", Cooking Light (June 2004).…it was a cover recipe.. .
Naturally, the cover picture and the recipe from the magazine is its best marketing tool, so I showed that picture to my husband and it got sold. He said sure……..
Lately, I discovered this combination of Dijon mustard, thyme, lemon and chicken to be mouth watering good in Martha’s Crusty Mustard Chicken recipe. If you want to try this combination start with this Sandwich recipe. It sure didn’t fail surprising my husband’s taste buds……
Try serving it with a hearty soup (Like a Cheddar Soup) and/or with some vegetable chips to round off the meal to that wholesome finish.


Grilled Chicken and Roasted Red Pepper Sandwiches with Fontina Cheese
Ingredients:
Chicken Breast Halves - 1 Lb, skinless, boneless
Fresh Lemon Juice - 1 tbsp
Dijon Mustard - 1 tbsp
Extra Virgin Olive Oil- 2 tsp
Dried marjoram - ¼ tsp
Dried thyme - ¼ tsp
Garlic cloves - 5 nos, minced and divided
Cooking spray
Onion - 1 Cup, vertically sliced
Sugar - 1 tsp
Fennel seeds - ¾ tsp, crushed
Red Pepper flakes - ¼ tsp
Salt - ¼ tsp
Roasted Red Bell Pepper - 1 Bottle, (7 Oz), drained and sliced
 Buy the roasted bell pepper from the “Mediterranean Bar” rather than the bottled kind.
The bottled kind has water to its weight, which is wasted.
Red Wine Vinegar - 1 tbsp
Freshly ground black pepper - 1/8 tsp
Rosemary Focaccia - 1 Loaf (12 Oz), cut in half horizontally
Low-fat Mayonnaise - 4 tsp
Fontina Cheese - 3 Oz, thinly sliced

Yields: 4 servings. (Serving size: 1 sandwich quarter).
462 (24% from fat); Fat: 12.2g (sat: 4.7g, mono: 3.7g, poly: 1.7g);

Calories:
Protein: 39.5g; Carb: 51.2g; Fiber: 5.6g; Chol: 90 mg; Iron: 3 mg; Sodium 981 mg; Calc: 199mg
Source: Cooking light magazine. Cover Recipe.

Cost:
Wegmans – Boneless, skinless breast chicken - $5.66
Lemon - $0.79
Dried thyme (Bulk Section) - $0.08
Flora - Roasted red bell peppers, 12 Oz - $2.69
Wegmans – Focaccia Bread - $3.50
Fontina cheese, 3 Oz (Val D’Aost) - $5.12
TOTAL = $17.84


Monday, December 14, 2009

"Appetizers"- Chicken-Zucchini Roll-Ups


Just couple days ago..I was watching "Iron Chef America- Battle Zucchini'.The chefs had to make 5 courses with Zucchini. They made amazing dishes which you wouldn't even think were possible with Zucchini. The
Judges were arguing whether Zucchini really has any 'Flavor' of its own??? Some said yes..it definately has a 'Flavor'. The other said.....no zucchini doesn't have any real flavor, but picks up the flavor of other ingredients.
I agree on both sides....Zucchini definitely has a subtle but distinct flavor and it surely does take on the flavors of other ingredients in the dish.
Though I do not rate Zucchini as one of my Favorite veggies...I still buy it to make Zucchini bread (I love it!), I use it in Pastas, make Zucchini  fritters, use it in Sambar etc etc.
And Now......I have discovered....a new way to use it!!!
To use it as a 'wrap' for appetizers!
The little Chicken -Zucchini Roll-up Bundles looked cute and tasted awesome!!!
The chicken was Spicy and well complemented by the soft texture and subtle flavor of zucchini.

Ingredients:
6 Bite size (or little bigger) pieces of boneless chicken( I cut out cubes from a boneless chicken breast)
6 long thinly cut Zucchini strips.

1/4tsp Ginger garlic paste
1/4tsp Chili powder
1/4tsp mint paste
1/4tsp turmeric
1/4tsp tandoor masala/ garam masala
1/4tsp cumin-corainder powder
few drops of lemon juice
salt
oil

Method:
1) Marinate the chicken pieces with ginger garlic paste, turmeric, lemon juice, chili powder, tandoor masala, salt etc.Let it sit in refrigerator for 15 mins.
2) Carefully cut thin strips of zucchini. Not too thick or thin.They should be sturdy enough to hold shape and able to wrap around the chicken.
3) Sprinkle little salt and chili powder over the zucchini strips.
4) Carefully wrap the strips around Marinated chicken and secure with a tooth pick.


5) Heat some oil in Non stick skillet.
6) Place the Roll up bundles carefully in the oil, vertically(tooth picks still on). Let it brown from bottom.Then turn around till the other side browns. Chicken at both ends should be browned.
7) Then turn the bundles around on their sides. Let the zucchini brown a little bit. Do not over cook. But the chicken should be cooked well through.Check with a  toothpick.
8) Cover the pan with a lid and let the bundles cook for 1-2 mins.
9) Remove promptly and serve warm.


A perfect Party Appetizer sure to wow your guests!

Saturday, December 12, 2009

"Appetizers"- Potato Balls with Spicy Green Peas filling


Usually, when 'M' gets home from work in the evening, he is pretty hungry. Loves to have some snack when he gets home.Couple days ago, this recipe came as 'extempore' .I was thinking what I can make for the snack today? Opened the refrigerator....found couple boiled potatoes ( my moms trick..to have couple boiled potatoes on hand!) and some left over 'spicy peas filling' Tadah......and we had an amazingly delicious snack within 15 mins. 'M' said he would rate these as one of the best appetizers he ever had! I said....WHY NOT??? Potato.... that too fried till golden brown......what can go wrong? It has to be delicious!!!! Even little 'E' munched on these and kept asking for more 'Vala'(i.e Vada) .....that's what he was calling them!

Potato Ball Covering:
1and1/2 cup mashed potato (without any lumps)
1/2 cup Seasoned bread crumbs
1/2tsp Cumin
1/2tsp Chili powder
1/2tsp garlic paste
Salt
oil for frying
1/4 cup seasoned bread crumbs for light dusting the balls.

1) Mix together mashed potatoes, bread crumbs, salt, cumin, chili powder,garlic etc.Knead well.Keep aside.

Spicy Green Peas filling
1 onion finely chopped
1 tomato finely chopped
1 cup frozen green peas
1/2tsp garam masala
1/2tsp cumin
1/2tsp mustard seeds
1/2tsp cumin-coriander powder
1/2tsp Chili powder
1/4tsp turmeric
salt
oil

1) Heat oil in a pan.Add mustard seeds amd let them splutter.Add the cumin seeds,onion and fry till golden colored.Add the tomatoes and rest of the spices.Fry 2-4 mins
2) Add the green peas and salt and fry again till the filling dries up.Let it cool.

Assembling Potato Balls with Green peas filling:
1) Take about 2tsp mashed potato mixture in hand.Make a depression in the middle.
2) Place 1 spoonfull filling in the center
3) Carefully cover with potato mixture and make into a round ball.
4) Roll the ball into bread crumbs. Dust any excess bread crumbs.
5) Heat oil in a deep pan. When hot enough to fry, carefully fry the Potato balls in the oil till golden brown from all sides.
6) Serve hot with Ketchup/ Hot and Sweet sauce/ Mint Chutney.

Variations:
The Potato balls can be stuffed with pretty much anything.....Chicken kheema, Paneer, Spinach, Corn or even some thick Green chili-coconut chutney.They all taste yummy!


Enjoy the slight- crunchy, but soft outer potato covering stuffed with spicy green peas to satisfy your craving for a delicious evening snack!


Friday, December 11, 2009

"Everyday Cooking"- Savory 'Black gram/Urad dal' muffins with spring onions/ Baked 'Medu Vadas'/Appe

It is kind of 'funny' to call these muffins.But they kind of are--- baked with leavening agents in a muffin pan and hence 'look' like muffins! I got the motivation to make these from the memories of something my mother made in India, it is called 'Appe'.
The batter was similar to 'Idli' or 'medu vada' batter Black gram/Urad dal paste (rice can be added), chopped onions, cilantro, green chillies etc. But instead of deep frying those, they were cooked in a 'special Appe iron gridle with depressions'. The 'Appe' came out golden brown and crispy on the outside ( kind of 'fried' appearance) , soft inside, fluffy and tasted delicious!!! They were a perfect snack! Loved eating those growing up!
Here is the picture of 'authentic' Appe being cooked-


I obviously do not have a 'Appe Griddle' here in USA and so came up with this version to be made in regular oven, in muffin pans! Try it out! They are delicious!

I did not use 'Rice' in the batter. I used Urad dal/ split black gram and some 'Rava'/ cream of wheat, to make these. I served these up with 'Coconut-Cilantro' chutney.But you can also serve it with Ketchup/ Hot and sweet sauce etc

Ingredients:
1cup Urad dal paste (Soak urad dal for 5-6 hrs. Grind with no or minimal water)
1/4cup Rava/Cream of wheat
1/4cup sour yogurt
1tsp lemoin juice
2tbsp spring onions chopped
1/4cup onion finely chopped
1/2tsp ginger paste
1/2tsp green chilies finely chopped
1/2tsp cumin seeds
1/2 tsp baking powder
1/4 tsp baking soda
salt
oil

For Coconut Chutney:
1/2cup fresh/frozen ground coconut
2 tsp roasted chana dalia
1/4 cup cilantro
1-2 green chilies
1 clove garlic
1/4tsp ginger
salt
sugar
water
oil, mustard,cumin,curry leaves for tempering.

1) Grind together coconut,chana dalia, garlic, ginger, cilantro, salt, sugar.
2) Heat 1tsp oil, add mustard, cumin, curry leaves, let it splutter.Add to the ground chutney.

For "Appe':
1) Mix together Urad dal paste, rava, onions, chilies, cumin, yogurt.Blend well.Keep aside for 10 mins
2) Preheat oven to 350 F.
3) Oil muffin pans liberally.The 'Appe' tend to stick as Urad dal is pretty sticky.So either use oil liberally or use non stick muffin pans. Oil also helps to give 'crisp' texture and 'fried' golden brown color.
4) Add lemon juice, baking powder, baking soda to the urad-rava batter.Mix only till well blended.
5) Immediately pour 2 tbsp batter into oiled muffin pans.Drizzle few drops of oil on the sides of the batter as well.Bake in the oven for 25 mins.
6) Turn up the heat to 425F. Bake for another 5-10 mins until the 'muffins/appe' look golden brown and cooked from within(check with a tooth pick).
7) Take out from the oven, let them sit for 10 mins.
8) Remove from the muffin pan
9) Serve warm with Coconut chutney/Ketchup.


                               Bite into the crisp- savory- golden brown muffin with soft- fluffy inside!

Monday, December 7, 2009

Rough weekend- Slow on Blogging this week :(

Rough weekend:
Had a pretty 'rough' weekend. On friday, we went out to dinner at this newly opened 'Italian Buffet' place.I was pretty excited about going there. I thought we all love Italian food..especially 'E' loves Pizza and Pasta. Also, this place has 'indoor fireworks' ( their ceiling would lite up every few minutes to mimic fire works show) and also has colorfull fountains.I was sure 'E' is going to love it and for a change sit still till we dine!
When we went there, 'E' actually did not eat much...may be 1/2 a slice of cheese Pizza. Both 'M' and I tried few different Pizzas but weren't satisfied with any and did not like any in particular. Had some salad along with the Pizzas. That was it...wasn't to happy about the dining experience there.But decided may be we will try the other stuff on their menu which wasn't included in the buffet .....the next time.
Came home....watched a movie...went to sleep.
Then...
It all started at around 1.30 am.....both M and I got terribly sick.....we were throwing up....had nausea.We were sick with food poisoning.....whole night we were awake and feeling terrible.Fortunately..since 'E' hadn't eaten much there....he was not affected and he slept throught the night.We were so thankfull for that!
So the rest of the weekend we were still suffering from Nausea, feeling weak, had little temperature, did not feel like eating anything...it was HORRIBLE!!!
All we ate throught the weekend was Plain daal and rice.That was the only thing we could keep in!
Even today.....we aren't feeling all that great. But definately better than past couple days.
So..
As you must have guessed .....I am not 'feeling' like cooking at all ! Don't know how long the nausea is going to last?
Hence, I am going to take it easy on cooking for the blog and keep to minimal cooking as needed.

Also, its 'Exam week' ....I have to submit Final exams for (Food Science-'Food Bioterrorism' ) course that I am taking through Ohio State University. This will be my 2nd last course for the series!
One more course to go.....and I will be done!


See you all once I am done with the exams and feel rejuvenated to cook again after the food poisoning incident!!

Hope you will join me again!

"Chatpata Chaat'- Bhel

What foods do you miss most...living away from your home country???
For me...its mostly the street foods....Bhel, Pani poori, Dabeli, Chana Choor,SPDP(Sev Potato Dahi Poori) etc etc.Not that we cannot make them here in USA....but the ease of stopping at one of the stalls, telling the vendor -how 'spicy' or 'sweet' you want your dish, the dish being made in front of you, chaating- gossiping with your buddies, savoring the tangy-spicy-sweet mouthwatering chaat.....ufff even the 'thought' makes me nostalgic and my mouth water!!!
Once,I was telling my colleague at Cornell  'How I miss Indian food'.He was surprised, he said.....but there are so many Indian restaurants here..why don't you eat there! I told him....they do not have 'all' the foods we get in India....and ofcourse the 'taste' is not as authentic. He asked me to describe some dish which I miss the most.I tried describing to him..'Bhel'...Puffed rice mixed with savory snack mixture, raw onions, tomatoes, Tamarind chutney.. etc etc He seemed confused....couldn't really 'get' what I  really miss????
I can totally understand....he hadn't tasted the addictive tangy-sweet-spicy taste of Bhel ...how would he know..what I really miss???
When I was reading 'Namesake' by Jhumpa Lahiri....a book about an 'immigrant' family......there, the couple migrates to US (may be in 1970's..don't exactly remember when) The lady is 'Bengali'. After coming to USA, she misses ofcourse her homeland, her friends and family....but also the 'food'. She becomes really homesick and tries making 'Bhel' with Rice Krispie cereal !!!!! How cool was that! Because those days finding 'puffed rice and indian grocery' wasn't as easy as it is now! So....we are amongst the lucky ones!!! We atleast can find what we need to make our favorite dish here in US of A!

Here is the recipe for 'Bhel':

Ingredients:
2 cups Puffed rice ( I haven't tried using Rice krispie cereal yet!!) Make sure its crispy.
1Cup Savory 'Hot Punjabi Mix' Farsan
1/2 cup thin Sev
1 onion  finely chopped
2 tomatoes finely chopped
1/4 cup chopped cilantro
1 tbsp roasted peanuts
1 tbsp raw mango chopped (if you like the tang)
Flat pooris if you want to make 'Bhel Poori'. I sometimes use 'Pringles' !!!

For Chutney:
1 tbsp Tamarind extract
1/4 cup grated jaggery
1/2tsp cumin-corainder powder
1/2tsp chili powder
1/4tsp chaat masala
salt
1/2cup water
Mix everything in the water and make Tangy-sweet- spicy chutney.This chutney is pretty watery.

For extra spice:
Crush green chilies and garlic together into fine paste. Add to bhel as needed.

Mixing bhel:
1) Mix together the puffed rice, farsan, half of the sev, onion, tomatoes, peanuts, mango etc.
2) Add the tamarind chutney to make the bhel 'wet' but not soggy.
3) Garnish with remaining sev, cilantro, pooris/ pringles etc
4) Serve immediately!

Enjoy the blissfull combination of various textures and tastes all packed in one mouthwatering dish!

Friday, December 4, 2009

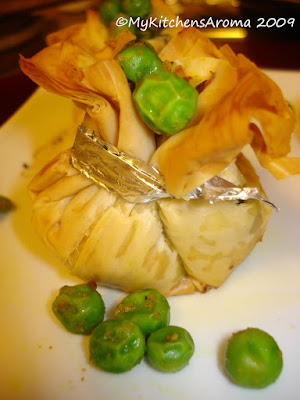
"Appetizers" -Phyllo 'Potlis' with Spiced Green Peas


I know what you are thinking...."She is obsessed with 'Phyllo dough'! Actually it  is not a 'obsession' but more of a 'fascination'.....how many different ways can I use the Phyllo dough! I am just experimenting with shapes, fillings, toppings, tastes- sweets-savories etc. And since I still have half of the phyllo dough sheets still sitting in my refrigerator...you may expect to see more of 'Phyllo' recipes!
Anyways...
Last afternoon, I was thinking what shape to go for today... And I remembered the 'Potli' style bags famous in India.They come in all different colors, sizes with pretty bead work and fancy strings.They are really  very pretty!Perfect I thought! I could do that! I can mold the phyllo into little 'Potlis' and stuff them with spicy green peas filling!

Here is the recipe:
For the Phyllo Dough
 6 sheets of Phyllo dough thawed at room temperature
1/2 tbsp butter melted
1)Place 1 Phyllo sheet on  a flat surface.Brush butter on the surface.
2) Place the next sheet on top.Press flat gently.Apply butter.Repeat for all 6 sheets.
3) Cut into 6 squares of equal size. If you want 'bigger' Potlis cut into 4 squares.
4) Keep covered with moist cloth untill ready to use. They dry up fast!

Spicy Green Peas filling
1 onion finely chopped
1 tomato finely chopped
1 cup frozen green peas
1/2tsp garam masala
1/2tsp cumin
1/2tsp mustard seeds
1/2tsp cumin-coriander powder
1/2tsp Chili powder
1/4tsp turmeric
salt
oil

1) Heat oil in a pan.Add mustard seeds amd let them splutter.Add the cumin seeds,onion and fry till golden colored.Add the tomatoes and rest of the spices.Fry 2-4 mins
2) Add the green peas and salt and fry again till the filling dries up.Let it cool

Phyllo Potlis assembly
1) Take 1 square of layered phyllo dough.Place 1 spoonfull filling in the center.
2) Pull up all corners gently and make into 'Potli'/Pouch.
3) Tie with 'Aluminun foil strips' or green onion leaves.I used aluminun foil strips.
4) Place on baking sheet and bake at 400 F for 20-25 mins untill the 'Potlis' turn Golden brown on all sides.
5) Serve warm with Ketchup/ Hot and sweet suace.Untie the aluminum foil before serving OR for more 'Interest' let your guests untie the 'Potli' before eating.


Untie the 'Potli'...Bite into the crisp buttery Phyllo dough and savor the Spicy green peas!

Wednesday, December 2, 2009

"Everyday Cooking"- Chicken Frankie/ Chicken Kati Roll


There are so many famous street foods in India that are amazingly delicious, mouthwatering, sometimes healthy too! Because of 'mingling' of the cultures, 'what originated where'...is a big question! In Maharashtra..the famous Dabeli (Origin:Gujrat), Pani poori/Bhel(Chaats) (Origin: Delhi), Chinese food (Origin:China), Vada Pav (Origin: Mumbai), Misal Pav (Origin: Kolhapur), Dosas/Uttapa/Vadas(Origin: S.India) are some of the famous street foods. Also famous is the Kati Rolls/ frankies.I still do not know why they are called 'Frankies' but just found out that the 'Kati Roll' originated in 'Kolkatta'! Did not know that! Wikipedia says: Kati roll is street-food originating from Kolkata, India. Its original form was a kati kabab enclosed in a paratha, but over the years many variants have evolved all of which now go under the generic name of Kati Roll. Today, pretty much any filling rolled up in any kind of Indian flatbread is called a kati roll.
Last week I made my mom's Veggie version of the Frankies and this weekend I thought I will give my friend 'P' the taste of Maharashtrian street food (Had not quite realised the origin is 'bengali' though!!)  when her family comes over for lunch! Anyways..that doesn't make the 'Kati Rolls' any less delicious....and we all enjoyed the spicy-tangy chicken wrapped in wheat chapati/paratha.
Ingredients:
For the Chapatis/Tortillas/Wrap
They are usually made with 'All purpose flour' and little whole wheat flour added to it.But my mom and hence me.... prefer to use the 'whole wheat flour'.
1 cup Whole wheat flour (if you want all pupose flour add 1/2 cup whole wheat flour+1/2 cup all purpose flour)
2tsp oil
salt
(2 Eggs beaten) +salt and little chili powder)-needed when assembling the Kati roll
Mix flour,oil , salt and knead into a soft dough with water.
Roll out the dough into circle thin chapatis/tortillas.Roast lightly on hot flat pan/tava.The chapati will finish roasting after the filling is filled.

For chicken filling:
1 lb Boneless chicken cut in small pieces
2 onions chopped
1/4cup crushed tomatoes
1/2tsp ginger garlic paste
1/2tsp Chicken curry masala
1/2tsp cumin-coriander powder
1/2tsp cumin
1/2tsp turmeric powder
1/2tsp chili powder
1tsp Mint paste
chopped cilantro
oil
salt

For topping: Onions,Green Pepper,Red Pepper sauted with salt and black pepper

Method:
1) Marinate chicken pieces in ginger garlic paste, mint paste, turmeric, chili powder etc.Keep aside for 1/2hr.
2) Heat 1tbsp oil, add the onions.Saute till brownish.Add the tomato paste and saute till nicely fried.
3) Add the marinated chicken and other spices. Cook till all the juices dry up and chicken is tender.
4) Garnish with chopped cilantro

For my 'SECRET' chutney:
This one is my favorite quick chutney. It's tangy-spicy-minty.Goes well with Samosas,Vadas, most appetizers etc. Its color is brown and so most people think its 'tamarind' chutney.But actually it is just 'Jazzed up Ketchup!
1/2cup tomato ketchup
1tbsp Maggie hot and sweet sauce
1tbsp Mint paste
1/4tsp chili powder
1/2tsp sugar
1/2tsp chaat masala
salt
Mix everything together and your chutney is ready!

Assembling the Kati Rolls:
1) Brush the wheat chapati with beaten egg mixture and put on oiled pan/tava (the egg side down) Let the egg cook.Take off the heat. Apply the above chutney liberally on the egg side.The egg side will be inner side of the roll.
OR
Make thin egg omlettes first and place them in the wheat chapati/paratha.
2) In the center add 2 spoonfulls of the chicken, onions and peppers and fold into a roll.Secure with tooth pick if necessary.
3) On heated tava/pan apply little oil and warm up the roll, till golden brown.
4) Wrap half way in foil/paper.
5) Serve hot with or without the chutney/raw onions etc.