Popular Recipes

Showing posts with label cream cheese. Show all posts

Monday, October 8, 2012

Quick and Super Easy Creamy Tomato- Basil soup

To celebrate the 'dancing' success of our little "Columbus Rockstars" (They rocked the stage... on tunes of "Auntyji Auntyji Get up and Dance" from Ekk mai aur Ekkk tu).....


We took "D' their dance instructor on a lunch treat.'Johnny Carinos' was the place by choice. Mostly everyone opted for the soup/salad and entree option. I ordered the Tomato Florentine soup and Spicy Chicken Flatbread.Yummm Yuummm Yummooo. The creamy tomato soup in the chilly fall weather...just PUUURRRFECCT!!!
Last night, for dinner at "A''s ....made a Super Easy version of Creamy Tomato Basil soup..and SLURPPP...everyone loved it to the last drop:)

Ingredients:
2 cans "Condensed tomato soup"
1.5 cups milk
3tbsp Cream cheese at room temperature
1/4 cup finely chopped onion
1clove garlic minced
1 tsp dried basil leaves
1/4 tsp ground black pepper
1/4tsp red chili powder
1tsp butter
1tsp sugar
Fresh Basil leaves for garnish
salt
Croutons

Method:
1) Saute the onion and garlic in 1tsp butter till translucent.
2) Add the canned tomato soup and milk.
3) Add the black pepper, chili powder, salt, sugar, basil leaves and simmer the soup on low for 3-4 mins.
4) Stir in cream cheese. Mix with a wisk for 5-8 mins, until all the cheese is nicely blended.Or you can use a hand blender
5) Garnish with fresh basil. Serve hot with crunchy croutons!!


Thursday, August 16, 2012

"Sweet Treats"- Mango-Pineapple-Cream cheese Gelatin molds

From the last weeks ''Mango Sago pudding"...I had Mango pulp and condensed milk leftover. To use that up and to make some snack/ dessert....these pretty  Gelatin molds came into being!!
'E' loved snaking on these after coming from school,, and we made Gelatin hearts and flowers with the cookie cutters!
I had loved this dessert- 'Mango Cheese Cake' that 'S' had made.
http://my-kitchens-aroma.blogspot.com/2011/07/aroma-from-guest-kitchen-guest-soniya.html

On similar lines with few modifications, I made a tropical "Mango-Pineapple Cream Cheese gelatin mold"

Ingredients:
1 Cup Mango Pulp(I used Kesar Mango pulp)
4 oz Cream cheese
1/2 can of Sweetened Condensed milk
1 pkg Jello Island Tropical Pineapple gelatin
Mango slices for the garnish
Cookie cutters for cutting shapes

Method:
1) Bring cream cheese to room temperature. Microwave for 4 secs just to make it soft.
2)Heat 1 cup water. Dissolve the Pineapple gelatin in the water by stirring.
3) Mix the mango pulp,condensed milk in the gelatin mix.Stir the cream cheese. Use hand /hand mixer to blend it well and make it smooth.
4) Pour into a flat  glass tray/dish.Spray the dish with cooking spray before pouring the gelatin.

5) Let it set in the refrigerator for few hours.
5) Serve cold by cutting 'pie' shapes or by cutting various shapes with a cookie cutter.Garnish with sliced mango.


Monday, June 18, 2012

"Appetizers"- Red Bell Pepper and Broccoli Pinwheels

Little kids love colorful finger foods....They love these tiny pinwheels with Veggies....so tasty, so colorful, with their favorite cream cheese and so easy to handle for their Teeny-Tiny fingers!!
These were one of the snacks for 'E'' and 'A's Dinosaur themed birthday party last week.
These pinwheels are so versatile..you can put almost anything in cream cheese and roll these up!
I have had...Spinach-Jalapeno pinwheels, Black beans and Salsa pinwheels, Onion and green chili pinwheels.....and they all tasted delicious!!!
I went ..the colorful route..I used the vibrant Red Bell Pepper and the fresh Green Broccoli!!!Together they looked so pretty in the white cream cheese and the tortillas background...
Ingredients:
8 white/wheat tortillas

Veggie Cream Cheese
1(8oz) package of Philadelphia plain cream cheese
3/4 cup finely chopped red bell pepper
3/4 cup finely chopped broccoli
1tsp ginger-garlic paste
1/2 tsp cumin
1/2 tsp red chili powder
2tsp olive oil
salt

Method:
1) Heat 2tsp olive oil.Add cumin,ginger garlic paste, red pepper,broccoli and salt.Saute till tender and cooked.Let it cool.
2) Bring cream cheese to room temperature.Mix red chili powder and the sauteed veggies.Mix well
3) Spread a spoonful of cream cheese-veggie mixture on the tortilla.Roll tightly into a roll.
4) Roll the Tortillas rolls and chill in refrigerator till ready to serve.
5) Cut each roll horizontally into 6 pieces. Serve at room temperature.


Monday, October 3, 2011

"Appetizers"- Grapes coated with Cheese and Nuts

'Navaratri' 2011 celebrations are going on all over.....and we celebrated 'Bhondla' last week here in Columbus! 'Bhondla' is a Maharashtrian 'All Girls' celebration where in......girls and women get together all dressed up in nice clothes.They hold hands and go around in circles singing songs.Some of these songs are hilarious ...praising their 'maher'(mothers side) and talking about how bad their 'in-laws' side is!!!
After the songs ....it's yummy food time!!! Each women brings in some snack/ food item which she won't disclose.Everyone else has to make guesses ....what the dish could be! So...everyone tries to make things that are hard to guess...

Yes...you guessed it.....mine was really very hard to Guess!!!! I made these yummy sweet and sour and nutty grapes.....coated with Cream and blue cheese...
"P' had made similar ones for 'K's birthday with Goat cheese and walnuts .
Ingredients:

1) About 50 Red/ green seedless grapes washed and dried with paper towel
2) 8 oz Cream cheese
3) 1-2 tbsp Blue cheese( If you like....)
4) 2tbsp milk
5) 1 tbsp sugar
5) Finely chopped Pistachios and almonds
6) Grated sweetened coconut flakes
Method:
1) Mix together cream cheese and blue cheese with electric mixer. Add the milk and beat again.
2) Coat the grape with cream mixture with your hands and place on a cookie sheet lined with parchment /wax paper
3) Sprinkle sugar on the cheese coated grapes
4)Roll the grapes into chopped almonds/ pistachios/ sweet coconut and place on the wax paper

5) Chill for few hours before serving.Can be made a day or two in advance.

Serve the chilled, sweet and sour- cheese and nuts coated grapes and 'wow' your guests!!

Monday, June 20, 2011

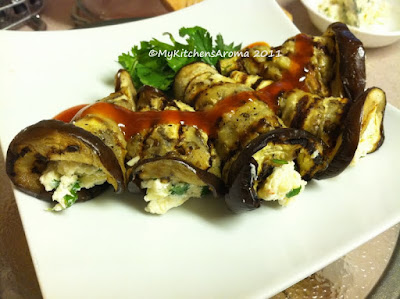
"Appetizers"- Eggplant Rollatinis


Are there any 'food choices' that are different between you and your significant other? They say that....after years of living together, a couple becomes 'like' each other. Do their food preferences change too???
Between me and 'M', there are many 'food differences'. I love Rice and dishes made with rice.He eats rice in the form of 'Biryani' only. I like eggplant.He hates eggplant.I like bananas.He can't stand bananas.I like prawns....he can hardly taste them....
So, when he is out for work..I indulge into my favorite foods!!! 
This was one such 'Eggplant' indulgence for me....


Ingredients:
8 Eggplant slices(about 3/4th cm thick, cut from center of a large eggplant)
1/4cup Cream cheese
1/4 cup pepper jack cheese shredded
2tbsp Parmesan cheese
1/2tsp red pepper flakes
1/4th tsp ground black pepper
1/4tsp garlic paste
1/4th cup chopped cilantro
salt
oil
Maggie hot and sweet sauce/ Marinara sauce/ ketchup
Method:
1) Apply salt and pepper on the eggplant slices. Rub a little oil.Grill on a 'grill pan' for a minute on both sides to cook the eggplant and get those gorgeous 'grill marks'.
( I love to eat the grilled eggplant just by itself too!!!!)

2) Mix the cheeses, red pepper, black pepper, salt, cilantro,garlic. etc to get the filling.
3)  Place the filling in the center of the grilled eggplant and roll it up into 'Rollatini'

4)  Serve along with Maggie hot and sweet sauce ( this one is my favorite.I can eat anything and everything with it!!!)  or Marinara sauce or Plain ketchup.

5) You can also bake the Rollatinis before serving with extra sauce and cheese on top.

                Enjoy the cheesy,spicy eggplant rollatini warm or hot!!

Monday, May 3, 2010

"Appetizers"-Oven Baked Jalapeno Poppers

I love Jalapeno Poppers!!! The first time, I had them was here in the USA.We were newly married and 'M' took me to this really fancy restaurant....oops I don't remember the restaurants name...thanks to my memory!
So,since then I became a big fan of Jalapeno poppers and eventually learned the recipe and made them myself.
Few months ago, we tried the Jalapeno poppers from 'Chilies'.....and weren't so happy because they came from the freezer and we could smell the 'freezer aroma'. So this time, I did not take any chances and made the Poppers at home....

This recipe....is for 'Oven baked' Poppers, but can easily be used to make the 'fried' kind....if you don't want to sacrifice the outer crunch from frying!
Ingredients:
12 Jalapenos
4 oz cream cheese
1/4 cup cheddar cheese
1 clove garlic finely minced
1tablespoon chopped cilantro
1/2 tsp red chili powder
1/4 cup all purpose flour
1 large egg (beaten)
1/2 cup bread crumbs
Oil for drizzle
salt
black pepper

Method:
1) Slit the jalapenos length wise and de seed them completely.Wear gloves if you are sensitive.The jalapenos for this recipe should be mildly 'hot'.Of course you wouldn't know that until you give them a taste!

2) Mix together cream cheese, cheddar cheese, garlic, cilantro,chili powder, salt, pepper to make the 'filling'. With a small spoon or a piping bag fill the de seeded jalapenos with the filling and press them shut.Or if you like the poppers 'super stuffed'...stuff in some extra filling!

3) Make a assembly -line of flour, egg and bread crumbs.Dip the poppers in flour first, then egg and then bread crumbs to completely coat them.

4) Place them on a greased baking sheet and chill in refrigerator for 30 mins.
5) Pre heat the oven to 350F . Drizzle the poppers with oil to help give 'brown' color and some crunch after baking.Bake for about 15-20 mins or so or until lightly browned.
Note: Some cheese may ooze out if baked longer or at high temperature.


If  Frying= Heat oil in saucepan. Fry the coated chilled poppers 1-2 at a time till golden brown

6) Serve warm either just by themselves or with Ketchup/ marinara sauce.....enjoy the spice from the jalapenos, the tangyness from the cheese and the crunch from the coating! Yumm Yumm yumm!

Saturday, January 2, 2010

"Pat-a-Cake" - Chocolate Fudge Cake with Cream cheese+Ricotta cheese icing

All of last week and this week, both 'M' and 'E' had holidays. We did not travel anywhere, but did a lot of eating, relaxing , watching movies and sleeping! That is all what you are looking forward to ...at times!
So.....in the holidays..'M' had been asking me that he wanted to bake cake either for Christmas or New years. Due to my laziness, I kept postponing it.....will do it later..will do it tomorrow...were my answers.

Finally....he took the initiative...got a 'Betty Crocker' mix and baked a cake all by himself at 10 pm on 30th night!!! Now that's the Spirit! I was really proud of him!
Next day it was upto me....to do the rest.....icing ...decoration and make it look prettier! The cake came out really good ( Betty Crocker and 'M' you are the best!) ....and we further enhanced the moistness with a 'Spray' of coffee ( recipe follows) and the 'Icing on the Cake' was a creamy delicious blend of Cream cheese, Ricotta cheese and butter...and sugar! We enjoyed this dessert on New Years Eve along with some Good Friends, Laughter and a Game of Cards!


Ingredients:
For the Cake
1 packet Betty Crocker 'Chocolate Fudge' cake mix

For the 'Spray'
1 tsp instant coffee powder
1tsp sugar
1/2 cup water

For the Icing:
3/4 packet of 8 oz Cream cheese
1/2 cup Ricotta cheese
3tbsp butter
3/4 - 1 cup powdered sugar ( add as per the sweetness desired)
2-4 tbsp milk
1tsp vanilla extract
Maraschino cherries
Few brown M and M's
1 and 1/2 Hersheys Dark Chocolate bar Grated/ Curled

Method:
1) Bake the cake as per directions on the packet. Let it cool completely.
2) Boil 1 tsp coffee in 1/2 cup water and sugar for 5 mins. Let it cool.Fill the coffee in a 'spray' bottle.
3) Cut the cake carefully into 3 layers with a big knife or cake layer cutter.Place all three layers on different plates.Place the last /bottom layer on the stand you want to present the cake on.
4) Spray the layers generously with coffee mixture.Let it soak for 15 mins.
5) Mean time, mix together cream cheese, ricotta cheese, butter, sugar,vanilla and whip well with hand blender or a stand mixer. Mix till well blended, smooth and creamy.Add milk to adjust consistency.
6) Spread the frosting on the bottom most layer.Spread with a spatula evenly.
7) Place the next layer on top and repeat the same.Place the third and final layer and generously cover with the icing. Spread evenly and smoothly.

8) Grate/ curl Hersheys Dark chocolate Bar. Put the chocolate curls on the edge and sides of the cake.

9) Decorate the center with cherries and M and M's.
                            Enjoy the ULTIMATE  moist ....delicious .....creamy...chocolaty cake !!!

Tuesday, September 29, 2009

'Pat a Cake'- Cream cheese pound cake with orange zest


Since last evening 'E' has been down with cold.He is sneezing,has runny nose and is...pretty cranky! That means only one thing......me spending minimal time in the kitchen! Did not even cook anything for lunch.Asked 'M' to eat at work cafeteria,I ate the leftovers from the fridge and made only some warm rice and 'aamti' (daal) for 'E'.
So there is nothing 'new' I have here to share.But....
Good news.....tadah!!!!!!!!!!!!!!
I have been taking pictures and saving the recipes.....whenever I bake something (May be I thought..I will publish it one day!) Here is one such recipe...
What I had liked about it was.....it was a pound cake but made with adding cream cheese and orange zest.It was so much more flavorful than ordinary plain cake and pretty easy to bake.
The recipe comes from 'www.JoyofBaking.com'.This website has numerous recipes and many tips and tools for baking better.
Ingredients:
1) 3 cups (420 grams) all purpose flour
2) 1 teaspoons baking powder
3) 1/2 teaspoon baking soda
4) 1/2 teaspoon salt
5) 1 1/2 cups (340 grams) (3 sticks) unsalted butter, room temperature
6) 1-8 ounce (226 grams) package cream cheese, room temperature
7) 3 cups (600 grams) superfine or castor sugar
8) 6 large eggs, room temperature
9) 1 tablespoon pure vanilla extract
10) Zest of a lemon or orange (optional)
Note: To make your own superfine sugar - place 3 cups (600 grams) granulated white sugar in bowl of food processor. Process until very fine, about 30 seconds.
Method:
1) Preheat oven to 350 degrees F (177 degrees C) and place rack in center of oven. Butter and flour a 10 inch (25 cm) bundt pan.
2)In a large bowl, sift together the flour, baking powder, baking soda, and salt.
3)In the bowl of your electric mixer, or with a hand mixer, beat the butter and cream cheese until smooth. Add the sugar, in three additions, beating well after each addition. Continue beating on medium-high speed until light and fluffy (about 3 - 5 minutes). Add the eggs, one at a time, mixing well after each addition. Add the vanilla and lemon zest, if using, and beat until incorporated.
4) Add the flour mixture and mix just until incorporated. Pour the batter into the prepared pan and smooth the top.
5) Bake for 1 to 1 hour 15 minutes or until the cake is golden brown and a toothpick inserted in the center comes out clean.
6) Remove the cake from the oven and place on a wire rack to cool for about 20 minutes. Remove the cake from the pan and cool completely. (The cake is cooled in the pan first for about 20 minutes so the cake has time to set. The cake may collapse if you try to remove it from the pan too early.)
7) Serves 10 - 12 people.
8) Will keep several days well wrapped at room temperature and over a week when refrigerated. Can also be frozen.
Note: Serve plain or dusted with confectioners sugar (icing or powdered sugar). This cake is very nice when served with fresh berries and softly whipped cream. The acidity of the berries compliments the sweetness and richness of the cake. Also good with ice creams and/or strawberry or raspberry purees. Leftovers can be toasted lightly.
My Variations:
1) I halved the recipe and used everything 1/2 of what they say
2) I used a normal 'loaf' pan instead of a bundt pan