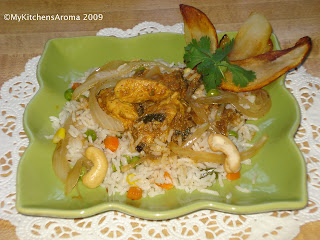
Before starting to cook for lunch, asked 'M' whether he would like 'Chicken curry' or Chicken Biryani' for lunch? 'M' is not a big fan of rice.He says,when he was a graduate student in Chicago,all he and his roommates would cook was....rice. It was easiest thingto cook and so he has had so much rice during those years..that now..he tries to avoid it whenever possible!
But, I have seen him eat rice whole heartily in one dish....'Chicken Biryani'.
With his approval on hand,I set to cook Chicken Biryani with 'layers'. Many 'dum biryani' recipes layer the rice and chicken alternately..and that's how famous 'Trushna's Biryani house' in Pune used to make it ,that's how my mom used to make it..and that's how I like to cook it too!
Recipe for Chicken :
Ingredients:
1 lb boneless chicken( you can use with bones too) cut into cubes
2 medium onions chopped vertically
1/2 cup grated coconut(fresh or dry)
2 tbsp tomato puree
2 cloves garlic
1/2 tsp grated ginger
1/2tsp sesame seeds
2tsp cilantro leaves and stems
1/2tsp chicken curry masala
1/2 tsp garam masala
1/2 tsp chili powder
1/4tsp turmeric
1/4 tsp cumin-coriander powder
2tsp mint paste
1tsp cumin seeds
1-2 bay leaves
1tbsp oil
salt to taste
Method:
1) Heat 1tsp oil, add the chopped onions and fry till golden brown.Add coconut,roast till brownish colored.Blend into smooth paste along with cilantro,garlic,ginger,sesame seeds.Keep aside.
2) Heat 2tsp oil,add bay leaves, cumin,the above paste and fry for 5-6 mins.Add turmeric,garam masala,chicken curry masala, chili powder,cumin coriander powder,tomato paste,mint paste,salt and fry again for 2-3 mins.
3) Add the cubes chicken and let it cook till well done.Add little water as and when needed.But the gravy should be thick and not too runny.
4) Garnish with cilantro leaves.
Recipe for Rice Pulav:
Ingredients:
1 cup Basmati rice,washed and drain
2 cups hot boiling water
1/2 cup mixed vegetable cut into small pieces (carrots,green beans,peas,corn etc)
2tsp ghee/butter
1/2tsp cumin
5-6 cloves
1/4tsp cinnamon powder
1/8tsp black pepper
1/8tsp cardamom powder
5-6 saffron sticks
Salt to taste
Method:
1) Heat 2tsp ghee,add cumin,cloves,rice and fry for 3-4 mins.
2) Add boiling hot water,black pepper,cinnamon,cardamom,saffron ,salt,vegetables etc and let it cook till almost well done.
3) Rice should be cooked,but individual grains should be seen (rice shouldn't be sticky).
4) Remove onto a plate and let cool.
For garnishing:
1) Fry 1 potato into finger chips
2) Fry 1 small onion into vertical chips
3) Roasted cashews
4)Chopped cilantro
5) Saffron sticks mixed in 1tsp milk
Layering Chicken and Rice to make Biryani:
1) In a heavy bottom pan, add 1tsp oil.Add 1/2 of the cooked chicken with gravy,some fried onions.
2) Add about 1/2 of the cooked rice on the chicken.
3) Sprinkle few drops of saffron milk and sticks
4) Add the remaining chicken,onions, cashews etc
5) Layer with remaining rice ,fried onions,potatoes,cashews.Sprinkle with saffron sticks in milk.
6) Close the pan with a tight lid.
7) Place the pan on a tava and then on a stove (this way the biryani won't burn when steaming/dum)
8) Steam the biryani for about 8-10 mins Without letting much steam escape.
9) Garnish with cashews,cilantro and Serve hot.
10) Can be served with cucumber raita/tomato soup/papad etc


 Yesterday's 'Navaratri Potluck' was a big hit.It was so nice to meet all friends together,share good food, laughter and for a change we (the adults) got to play cards while the kids played on their own..without (much) brawling! I really look forward to such potlucks..where things are kept casual..... just catch up with friends,relax, share recipes and good food,laugh..be your own self....it is soooo much fun !


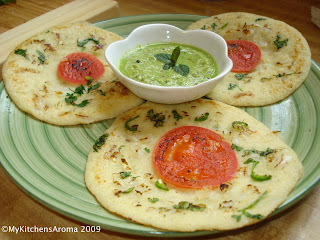
 'E' had a play date yesterday morning with my friend 'P's son and one another boy from his playgroup.Was wondering what snack I could make for them? Just 2 days ago,had asked my mom about the 'pumpkin pooris' she used to make for us.Since,I had the butternut squash left in the refrigerator,decided to make these.


 Amongst my favorite cuisines, I would rank 'South Indian' food in the top places.Growing up in multicultural Pune (Maharashtra,India),south indian food was on the menu of most of the restaurants. Though the variety was limited to idlies, dosas, uttapas and vadas. Even at home, idlies and dosas were made quite frequently.After coming to USA, amongst the many things I miss about India, are, the udipi restaurants and their paper thin,crisp dosas served with steaming hot sambar and spicy coconut chutney.'M' and I sometimes visit New Jersey for 1 reason....eat authentic south indian food! Yeah..it sounds crazy..that we drive 3-4 hrs from here down to NJ...but it is worth it! Even the temple in Bridgewater,NJ has a very good cafeteria with good south indian food.

 urry/Bhaaji

